Epson SureColor S70675 Setup Guide - Page 38
Choosing a Color Mode (S50675 and S70675), Installing Ink Cartridges
 |
View all Epson SureColor S70675 manuals
Add to My Manuals
Save this manual to your list of manuals |
Page 38 highlights
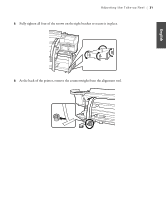
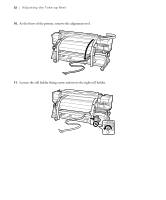
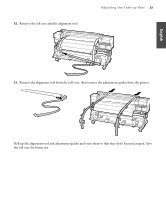
36 | Choosing a Color Mode (S50675 and S70675) Choosing a Color Mode (S50675 and S70675) Turn the printer on and configure the initial settings such as language and date using the control panel (for more information, see your User's Guide). Before loading the ink cartridges, you must first choose a color mode. By selecting a mode with more colors, you can install white ink cartridges (S50675) or both white and metallic silver ink cartridges (S70675). You can choose from the following color modes: • 4-color or 5-color (S50675) • 8-color (fixed), 8-color (unfixed), 9-color, or 10-color (S70675) No matter which color mode you choose, note that you must purchase an ink starter pack that contains 10 cleaning cartridges as well as the ink cartridges for your configuration. Installing Ink Cartridges Before loading the ink cartridges, you will first need to wash the print head. Note: If you selected the 4-color (S50675) or one of the 8-color (S70675) modes, you need to use the Replacement Cartridges to fill in the empty cartridge slots.These cartridges do not have ink in them and will not need to be replaced with the other ink cartridges. 1. Unpack the cleaning cartridges and, when prompted, install each one by sliding the cartridge into the slot and pushing the lever down to lock it in place, as shown on page 37. Note: You do not need to shake the cleaning cartridges. 2. Follow the instructions on the control panel to charge and discharge the cleaning liquid. 3. Remove the cleaning cartridges by lifting the lever and sliding the cartridge out.
-
 1
1 -
2
-
3
-
4
-
5
-
6
-
7
-
8
-
9
-
10
-
11
-
12
-
13
-
14
-
15
-
16
-
17
-
18
-
19
-
20
-
21
-
22
-
23
-
24
-
25
-
26
-
27
-
28
-
29
-
30
-
31
-
32
-
 33
33 -
 34
34 -
 35
35 -
 36
36 -
 37
37 -
 38
38 -
 39
39 -
 40
40 -
 41
41 -
 42
42 -
 43
43 -
44
-
45
-
46
-
47
-
48
-
49
-
50
-
51
-
52
-
53
-
54
-
55
-
56
-
57
-
58
-
59
-
60
-
61
-
62
-
63
-
64
-
65
-
66
-
67
-
68
-
69
-
70
-
71
-
72
-
73
-
74
-
75
-
76
-
77
-
78
-
79
-
80
-
81
-
82
-
83
-
84
-
85
-
86
-
87
-
88
-
89
-
90
-
91
-
92
-
93
-
94
-
95
-
96
-
97
-
98
-
99
-
100
-
101
-
102
-
103
-
104
-
105
-
106
-
107
-
108
-
109
-
110
-
111
-
112
-
113
-
114
-
115
-
116
-
117
-
118
-
119
-
120
-
121
-
122
-
123
-
124
-
125
-
126
-
127
-
128
-
129
-
130
 |
 |
