Epson U200B Operation Manual - Page 18
Model with Parallel, Interface, Model with, Serial Interface
 |
View all Epson U200B manuals
Add to My Manuals
Save this manual to your list of manuals |
Page 18 highlights
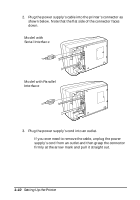
2. Plug the power supply's cable into the printer's connector as shown below. Note that the flat side of the connector faces down. Model with Serial Interface Model with Parallel Interface 3. Plug the power supply's cord into an outlet. t If you ever need to remove the cable, unplug the power supply's cord from an outlet and then grasp the connector firmly at the arrow mark and pull it straight out. 1-10 Setting Up the Printer
-
 1
1 -
2
-
3
-
4
-
5
-
6
-
7
-
8
-
9
-
10
-
11
-
12
-
 13
13 -
 14
14 -
 15
15 -
 16
16 -
 17
17 -
 18
18 -
 19
19 -
 20
20 -
 21
21 -
 22
22 -
 23
23 -
24
-
25
-
26
-
27
-
28
-
29
-
30
-
31
-
32
-
33
-
34
-
35
-
36
-
37
-
38
-
39
-
40
-
41
-
42
-
43
-
44
-
45
-
46
-
47
-
48
 |
 |

1–10
Setting Up the Printer
2.
Plug the power supply’s cable into the printer’s connector as
shown below. Note that the flat side of the connector faces
down.
3.
Plug the power supply’s cord into an outlet.
If you ever need to remove the cable, unplug the power
supply’s cord from an outlet and then grasp the connector
firmly at the arrow mark and pull it straight out.
Model with Parallel
Interface
Model with
Serial Interface