Epson V11H335120 User's Guide - Page 16
Choosing a Location
 |
UPC - 010343874862
View all Epson V11H335120 manuals
Add to My Manuals
Save this manual to your list of manuals |
Page 16 highlights
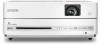
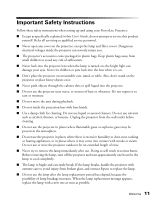
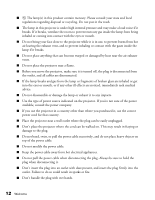
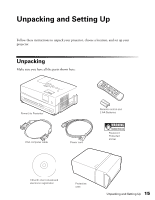
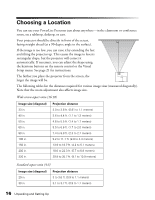
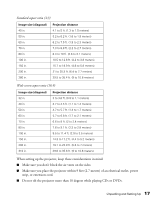
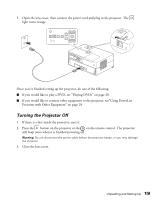
Choosing a Location You can use your PowerLite Presenter just about anywhere-in the classroom or conference room, on a tabletop, desktop, or cart. Your projector should be directly in front of the screen, facing straight ahead (at a 90-degree angle to the surface). If the image is too low, you can raise it by extending the feet and tilting the projector up. This causes the image to lose its rectangular shape, but the projector will correct it automatically. If necessary, you can adjust the shape using the keystone buttons on the remote control or the Visual Setup menu. See page 21 for instructions. The farther you place the projector from the screen, the larger the image will be. The following tables list the distances required for various image sizes (measured diagonally). Note that the zoom adjustment also affects image size. Wide screen aspect ratio (16:10) Image size (diagonal) 33 in. 40 in. 50 in. 60 in. 80 in. 100 in. 150 in. 200 in. 320 in. Projection distance 3.0 to 3.6 ft. (0.91 to 1.1 meters) 3.6 to 4.4 ft. (1.1 to 1.3 meters) 4.6 to 5.5 ft. (1.4 to 1.7 meters) 5.5 to 6.6 ft. (1.7 to 2.0 meters) 7.4 to 8.9 ft. (2.3 to 2.7 meters) 9.2 to 11.1 ft. (2.8 to 3.4 meters) 13.9 to 16.7 ft. (4.2 to 5.1 meters) 18.6 to 22.3 ft. (5.7 to 6.8 meters) 29.8 to 35.7 ft. (9.1 to 10.9 meters) Standard aspect ratio (4:3) Image size (diagonal) 29 in. Projection distance 3 to 3.6 ft. (0.9 to 1.1 meters) 30 in. 3.1 to 3.7 ft. (0.9 to 1.1 meters) 16 Unpacking and Setting Up
-
 1
1 -
2
-
3
-
4
-
5
-
6
-
7
-
8
-
9
-
10
-
 11
11 -
 12
12 -
 13
13 -
 14
14 -
 15
15 -
 16
16 -
 17
17 -
 18
18 -
 19
19 -
 20
20 -
 21
21 -
22
-
23
-
24
-
25
-
26
-
27
-
28
-
29
-
30
-
31
-
32
-
33
-
34
-
35
-
36
-
37
-
38
-
39
-
40
-
41
-
42
-
43
-
44
-
45
-
46
-
47
-
48
-
49
-
50
-
51
-
52
-
53
-
54
-
55
-
56
-
57
-
58
-
59
-
60
-
61
-
62
-
63
-
64
-
65
-
66
-
67
-
68
-
69
-
70
-
71
-
72
-
73
-
74
-
75
-
76
-
77
-
78
-
79
 |
 |