Epson V11H335120 User's Guide - Page 35
Up and, When you are projecting through the USB port, you can use
 |
UPC - 010343874862
View all Epson V11H335120 manuals
Add to My Manuals
Save this manual to your list of manuals |
Page 35 highlights
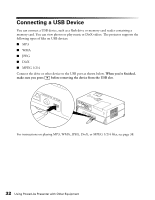
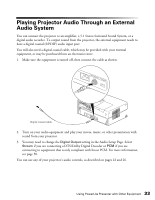
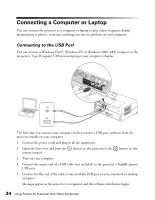
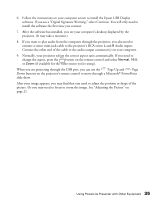
6. Follow the instructions on your computer screen to install the Epson USB Display software. If you see a "Digital Signature Warning," select Continue. You will only need to install the software the first time you connect. 7. After the software has installed, you see your computer's desktop displayed by the projector. (It may take a moment.) 8. If you want to play audio from the computer through the projector, you also need to connect a stereo mini-jack cable to the projector's RCA stereo L and R Audio inputs. Connect the other end of the cable to the audio output connector(s) on your computer. 9. Normally, your projector selects the correct aspect ratio automatically. If you need to change the aspect, press the button on the remote control and select Normal, 16:9, or Zoom (if available for the video source you're using). When you are projecting through the USB port, you can use the Page Up and Page Down buttons on the projector's remote control to move through a Microsoft® PowerPoint slide show. After your image appears, you may find that you need to adjust the position or shape of the picture. Or you may need to focus or zoom the image. See "Adjusting the Picture" on page 21. 35 Using PowerLite Presenter with Other Equipment
-
 1
1 -
2
-
3
-
4
-
5
-
6
-
7
-
8
-
9
-
10
-
11
-
12
-
13
-
14
-
15
-
16
-
17
-
18
-
19
-
20
-
21
-
22
-
23
-
24
-
25
-
26
-
27
-
28
-
29
-
 30
30 -
 31
31 -
 32
32 -
 33
33 -
 34
34 -
 35
35 -
 36
36 -
 37
37 -
 38
38 -
 39
39 -
 40
40 -
41
-
42
-
43
-
44
-
45
-
46
-
47
-
48
-
49
-
50
-
51
-
52
-
53
-
54
-
55
-
56
-
57
-
58
-
59
-
60
-
61
-
62
-
63
-
64
-
65
-
66
-
67
-
68
-
69
-
70
-
71
-
72
-
73
-
74
-
75
-
76
-
77
-
78
-
79
 |
 |