Epson XP-340 Users Guide - Page 41
Using WPS to Connect to a Network, Printing a Network Status Sheet - setup
 |
View all Epson XP-340 manuals
Add to My Manuals
Save this manual to your list of manuals |
Page 41 highlights
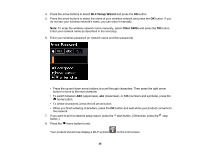
Parent topic: Wi-Fi Networking Using WPS to Connect to a Network If you have a WPS-enabled router or access point, you can use Wi-Fi Protected Setup (WPS) to connect your product to the network. 1. Press the WPS button on your router. 2. On the product, press the home button, if necessary. 3. Press the arrow buttons to select Wi-Fi Setup and press the OK button. 4. Press the arrow buttons to select Wi-Fi and press the OK button twice. You see this screen: 5. Press the arrow buttons to select Push Button (WPS) and press the OK button. 6. Follow the instructions on the LCD screen to complete WPS setup. If the network connection is successful, a Wi-Fi icon with connection bars screen. Parent topic: Wi-Fi Protected Setup (WPS) appears on the LCD Printing a Network Status Sheet You can print a network status sheet to help you determine the causes of any problems you may have using your product on a network. 41
-
 1
1 -
2
-
3
-
4
-
5
-
6
-
7
-
8
-
9
-
10
-
11
-
12
-
13
-
14
-
15
-
16
-
17
-
18
-
19
-
20
-
21
-
22
-
23
-
24
-
25
-
26
-
27
-
28
-
29
-
30
-
31
-
32
-
33
-
34
-
35
-
 36
36 -
 37
37 -
 38
38 -
 39
39 -
 40
40 -
 41
41 -
 42
42 -
 43
43 -
 44
44 -
 45
45 -
 46
46 -
47
-
48
-
49
-
50
-
51
-
52
-
53
-
54
-
55
-
56
-
57
-
58
-
59
-
60
-
61
-
62
-
63
-
64
-
65
-
66
-
67
-
68
-
69
-
70
-
71
-
72
-
73
-
74
-
75
-
76
-
77
-
78
-
79
-
80
-
81
-
82
-
83
-
84
-
85
-
86
-
87
-
88
-
89
-
90
-
91
-
92
-
93
-
94
-
95
-
96
-
97
-
98
-
99
-
100
-
101
-
102
-
103
-
104
-
105
-
106
-
107
-
108
-
109
-
110
-
111
-
112
-
113
-
114
-
115
-
116
-
117
-
118
-
119
-
120
-
121
-
122
-
123
-
124
-
125
-
126
-
127
-
128
-
129
-
130
-
131
-
132
-
133
-
134
-
135
-
136
-
137
-
138
-
139
-
140
-
141
-
142
-
143
-
144
-
145
-
146
-
147
-
148
-
149
-
150
-
151
-
152
-
153
-
154
-
155
-
156
-
157
-
158
-
159
-
160
-
161
-
162
-
163
-
164
-
165
-
166
-
167
-
168
-
169
-
170
-
171
-
172
-
173
-
174
-
175
-
176
-
177
-
178
-
179
-
180
-
181
-
182
-
183
-
184
-
185
-
186
-
187
-
188
-
189
-
190
-
191
-
192
-
193
-
194
-
195
-
196
-
197
-
198
-
199
-
200
-
201
-
202
-
203
-
204
-
205
-
206
-
207
-
208
-
209
-
210
-
211
-
212
-
213
-
214
-
215
-
216
-
217
-
218
-
219
-
220
-
221
-
222
-
223
-
224
-
225
-
226
-
227
-
228
-
229
-
230
-
231
-
232
-
233
 |
 |
