Fagor 24 Inch Dual Fuel User Manual - Page 12
Installing The Anti-tip Stability Chain
 |
View all Fagor 24 Inch Dual Fuel manuals
Add to My Manuals
Save this manual to your list of manuals |
Page 12 highlights
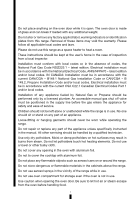
2.3 INSTALLING THE ANTI-TIP STABILITY CHAIN WARNING a) Please use caution in operating the range as it can tip over and cause damage or even death. b) We recommend that you install the anti-tip device to the surrounding cabinets and/or the range. There are two chains at rear left and right side of appliance which can be fastened to the wall or cupboards beside this appliance. c) Attach the range to the anti-tip device, attaching the two chains at rear left and right of appliance to the wall or cupboards beside this appliance. d) If the range is not sturdy or begins to move from its position, we recommend that you re-install the anti-tip device. e) See instructions below for further details. f) Failure to install the anti-tip device properly can potentially result in serious injury or death. THIS RANGE MUST BE SECURED BY PROPERLY INSTALLED ANTI-TIP DEVICES. TO CHECK IF THE DEVICES ARE INSTALLED PROPERLY, GRASP THE TOP REAR EDGE OF THE RANGE AND CAREFULLY ATTEMPT TO TILT IT FORWARD SLOWLY. The range is supplied with an anti-tip device to prevent the appliance from tilting forward and causing accidental damage to the gas pipe. For proper installation of the anti-tip device, please follow the steps below: 1) Take the expansion with the hook and make an adequate hole in the wall behind the area of installation the same height as the chain fixing area. 2) Insert the plug into the hole and screw in the hook until it is firmly attached to the wall. 3) Link the chain to the hook. 4) Adjust the level of the cooker inserting the feet provided. 12
-
 1
1 -
2
-
3
-
4
-
5
-
6
-
 7
7 -
 8
8 -
 9
9 -
 10
10 -
 11
11 -
 12
12 -
 13
13 -
 14
14 -
 15
15 -
 16
16 -
 17
17 -
18
-
19
-
20
-
21
-
22
-
23
-
24
-
25
-
26
-
27
-
28
-
29
-
30
-
31
-
32
-
33
-
34
-
35
-
36
-
37
-
38
-
39
-
40
-
41
-
42
-
43
-
44
-
45
-
46
-
47
-
48
-
49
-
50
-
51
-
52
-
53
-
54
-
55
-
56
-
57
-
58
-
59
-
60
-
61
-
62
-
63
-
64
-
65
-
66
-
67
-
68
-
69
-
70
-
71
-
72
-
73
-
74
-
75
-
76
-
77
-
78
 |
 |
