Fisher and Paykel DD24DCTX7 BOOK INSTL DD24D Ph7 US CA EN (English) - Page 19
Integrated Models Only - Installing The Front Panels, Adjust Panel Height To Align The Cabinetry
 |
View all Fisher and Paykel DD24DCTX7 manuals
Add to My Manuals
Save this manual to your list of manuals |
Page 19 highlights
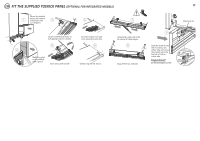
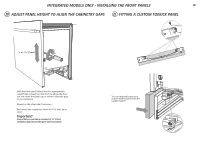
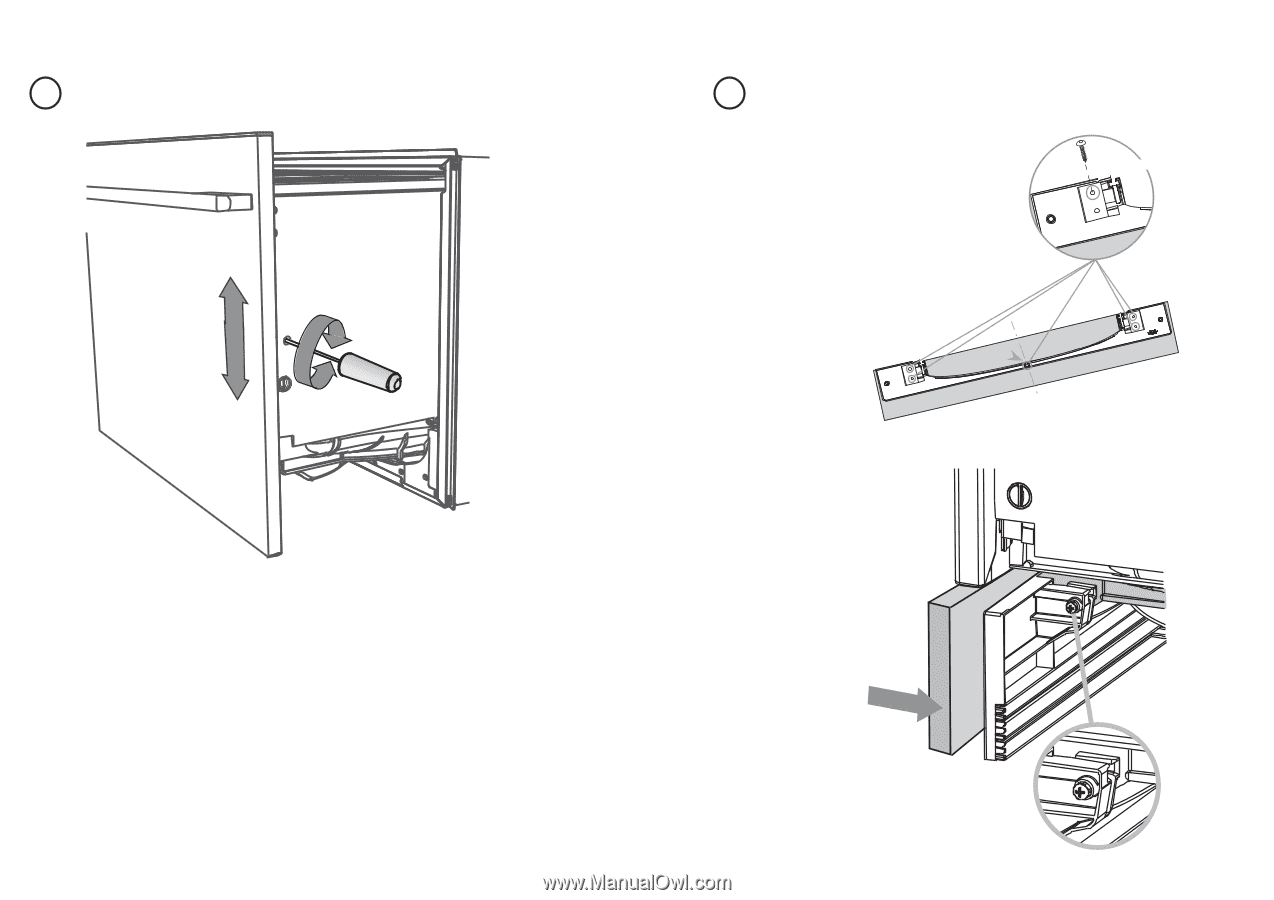
INTEGRATED MODELS ONLY - INSTALLING THE FRONT PANELS 19 20 ADJUST PANEL HEIGHT TO ALIGN THE CABINETRY GAPS 21 FITTING A CUSTOM TOEKICK PANEL 15⁄86"m(1m6mxm5) x5 + or - 1⁄16" (2 mm) With the front panels fitted, insert an appropriately sized Philips screwdriver into the hole above the door pin and rotate the panels up or down to align the gaps in your cabinetry. Repeat on the other side if necessary. Each panel has a maximum travel of 1⁄16" (2 mm) up or down. Important! Ensure that you maintain a minimum of 5⁄16" (8 mm) ventilation gap between the upper and lower panels. You can optionally glue your custom toekick panel onto the supplied panel
-
 1
1 -
2
-
3
-
4
-
5
-
6
-
7
-
8
-
9
-
10
-
11
-
12
-
13
-
 14
14 -
 15
15 -
 16
16 -
 17
17 -
 18
18 -
 19
19 -
 20
20 -
 21
21 -
 22
22 -
 23
23
 |
 |
19
INTEGRATED MODELS ONLY - INSTALLING THE FRONT PANELS
ADJUST PANEL HEIGHT TO ALIGN THE CABINETRY GAPS
FITTING A CUSTOM TOEKICK PANEL
20
21
You can optionally glue your
custom toekick panel onto the
supplied panel
With the front panels fitted, insert an appropriately
sized Philips screwdriver into the hole above the door
pin and rotate the panels up or down to align the gaps
in your cabinetry.
Repeat on the other side if necessary.
Each panel has a maximum travel of ·⁄²³” (2 mm) up or
down.
Important!
Ensure that you maintain a minimum of
5⁄²6” (8 mm)
ventilation gap between the upper and lower panels.
+ or - ±⁄²6” (2 mm)
5⁄8” (16mm) x±