Foxconn M61PMX English Manual. - Page 72
RAID Enable in BIOS, 3 Select a RAID Array for Use
 |
View all Foxconn M61PMX manuals
Add to My Manuals
Save this manual to your list of manuals |
Page 72 highlights
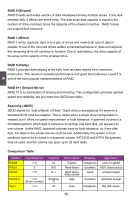
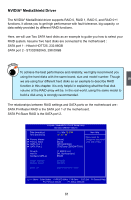
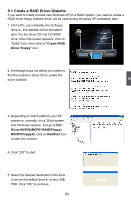
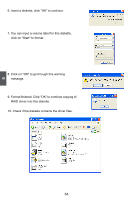
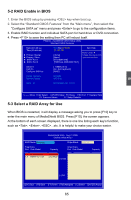
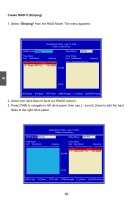
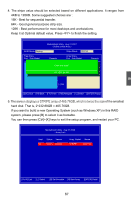
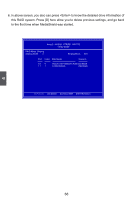
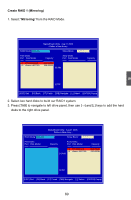
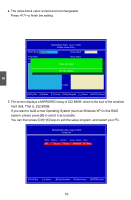
5 5-2 RAID Enable in BIOS 1. Enter the BIOS setup by pressing key when boot up. 2. Select the "Standard CMOS Features" from the "Main menu", then select the "Configure SATA as" menu and press to go to the configuration items. 3. Enable RAID function and individual SATA port for hard drive or DVD connection. 4. Press to save the setting then PC will reboot itself. Phoenix - AwardBIOS CMOS Setup Utility Standard CMOS Features Date (mm:dd:yy) Wed,Mar 12 2008 Item Help Time (hh:mm:ss) 18 : 30 : 59 Menu Level ► ► Primary Master [ None] Chage the day,month ► Primary Slave [None] year and century ► SATA Port 1 [ST3160815AS] ► SATA Port 2 [TSSTcorp CDDVDW TS-H] Driver A Halt On Configure SATA as Install Memory Memory Speed BIOS ID [ 1.4MM,3.5 in] [All , But Keyboard] [RAID] 2048MB 800 MHz MCP61M01.02.F1.D.03 Move Enter:Select +/-/PU/PD:Value F10:Save ESC:Exit F1:General Help F5: Previous Values F7: Setup Defaults 5-3 Select a RAID Array for Use When BIOS is restarted, it will display a message asking you to press [F10] key to enter the main menu of MediaShield BIOS. Press [F10], the screen appears. At the bottom of each screen displayed, there is one line listing each key's function, such as , , ...etc. It is helpful to make your choice easier. MediaShield Utility Aug 21 2006 - Define a New Array - RAID Mode: Mirroriendg Stripe Block: Optimal Free Disks Port Disk Model Capacity Array Disks Port Disk Model Capacity 10.10 SWTD3C32W06D2102A0S0JD-9 211918.709GB 1.0 Hitachi HDT725 232.88GB [+] Add [-] Del [ESC] Quit [F6] Back [F7] Finish [TAB] Navigate [↑↓] Select [ENTER] Popup 65
-
 1
1 -
2
-
3
-
4
-
5
-
6
-
7
-
8
-
9
-
10
-
11
-
12
-
13
-
14
-
15
-
16
-
17
-
18
-
19
-
20
-
21
-
22
-
23
-
24
-
25
-
26
-
27
-
28
-
29
-
30
-
31
-
32
-
33
-
34
-
35
-
36
-
37
-
38
-
39
-
40
-
41
-
42
-
43
-
44
-
45
-
46
-
47
-
48
-
49
-
50
-
51
-
52
-
53
-
54
-
55
-
56
-
57
-
58
-
59
-
60
-
61
-
62
-
63
-
64
-
65
-
66
-
 67
67 -
 68
68 -
 69
69 -
 70
70 -
 71
71 -
 72
72 -
 73
73 -
 74
74 -
 75
75 -
 76
76 -
 77
77 -
78
-
79
-
80
-
81
-
82
-
83
-
84
-
85
-
86
-
87
-
88
-
89
-
90
-
91
-
92
 |
 |