Fujitsu 4530C Operator's Guide - Page 72
Replacing the Pad ASSY, fi-4530CImage Scanner Operator's Guide
 |
View all Fujitsu 4530C manuals
Add to My Manuals
Save this manual to your list of manuals |
Page 72 highlights
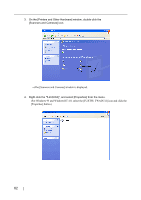
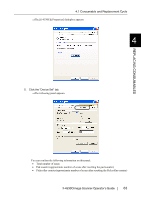
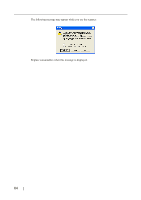
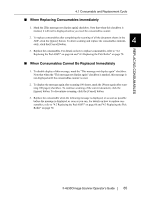
4.2 Replacing the Pad ASSY 4. Attach the new Pad ASSY. Insert the claws of the Pad ASSY into the holes on the ADF. Pressing down the Pad ASSY and slide it to the right to fix. ATTENTION Make sure that the Pad ASSY is firmly attached. When the Pad ASSY is not correctly attached, document jams or other feeding errors may occur. 4 5. Push in the center of the ADF to close it till the ADF button is locked. Press the center of the ADF REPLACING CONSUMABLES 6. Reset the pad counter. • For Windows 98 / Windows Me / Windows 2000 /Windows XP 1) When turning on the power, check that the scanner is connected to your PC. 2) Double click the [Printers and Other Hardware] icon on the operator panel of your PC. ⇒ The [Printers and Other Hardware] window is displayed. 3) On the [Printers and Other Hardware] window, double click the [Scanners and Cameras] icon. ⇒ The [Scanners and Cameras] screen is displayed. 4) Rihgt click the [fi-4530Cdj], and select [Properties] from the menu. 5) The [Properties of fi-4530Cdj] dialogbox appears. fi-4530CImage Scanner Operator's Guide 67
-
 1
1 -
2
-
3
-
4
-
5
-
6
-
7
-
8
-
9
-
10
-
11
-
12
-
13
-
14
-
15
-
16
-
17
-
18
-
19
-
20
-
21
-
22
-
23
-
24
-
25
-
26
-
27
-
28
-
29
-
30
-
31
-
32
-
33
-
34
-
35
-
36
-
37
-
38
-
39
-
40
-
41
-
42
-
43
-
44
-
45
-
46
-
47
-
48
-
49
-
50
-
51
-
52
-
53
-
54
-
55
-
56
-
57
-
58
-
59
-
60
-
61
-
62
-
63
-
64
-
65
-
66
-
 67
67 -
 68
68 -
 69
69 -
 70
70 -
 71
71 -
 72
72 -
 73
73 -
 74
74 -
 75
75 -
 76
76 -
 77
77 -
78
-
79
-
80
-
81
-
82
-
83
-
84
-
85
-
86
-
87
-
88
-
89
-
90
-
91
-
92
-
93
-
94
-
95
-
96
-
97
-
98
-
99
-
100
-
101
-
102
-
103
-
104
-
105
-
106
-
107
-
108
-
109
-
110
-
111
-
112
-
113
-
114
-
115
-
116
-
117
-
118
-
119
-
120
-
121
-
122
-
123
-
124
-
125
-
126
-
127
-
128
-
129
-
130
-
131
-
132
-
133
 |
 |
