Fujitsu FPCR33571 User Manual - Page 69
Installing the optical drive, Finishing component removal
 |
View all Fujitsu FPCR33571 manuals
Add to My Manuals
Save this manual to your list of manuals |
Page 69 highlights
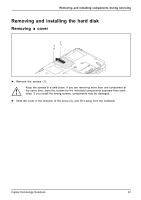
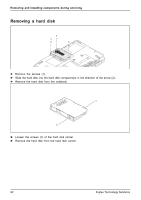
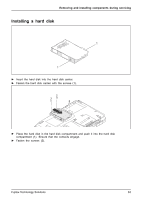
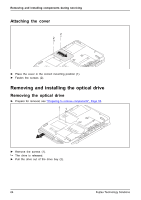
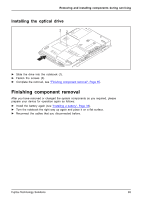
Removing and installing components during servicing Installing the optical drive 22 1 1 ► Slide the drive into the notebook (1). ► Fasten the screws (2). ► Complete the removal, see "Finishing component removal", Page 65. Finishing component removal After you have removed or changed the system components as you required, please prepare your device for operation again as follows: ► Install the battery again (see "Installing a battery", Page 33). ► Turn the notebook the right way up again and place it on a flat surface. ► Reconnect the cables that you disconnected before. Fujitsu Technology Solutions 65
-
 1
1 -
2
-
3
-
4
-
5
-
6
-
7
-
8
-
9
-
10
-
11
-
12
-
13
-
14
-
15
-
16
-
17
-
18
-
19
-
20
-
21
-
22
-
23
-
24
-
25
-
26
-
27
-
28
-
29
-
30
-
31
-
32
-
33
-
34
-
35
-
36
-
37
-
38
-
39
-
40
-
41
-
42
-
43
-
44
-
45
-
46
-
47
-
48
-
49
-
50
-
51
-
52
-
53
-
54
-
55
-
56
-
57
-
58
-
59
-
60
-
61
-
62
-
63
-
 64
64 -
 65
65 -
 66
66 -
 67
67 -
 68
68 -
 69
69 -
 70
70 -
 71
71 -
 72
72 -
 73
73 -
 74
74 -
75
-
76
-
77
-
78
-
79
-
80
-
81
-
82
-
83
-
84
-
85
-
86
-
87
-
88
-
89
-
90
-
91
 |
 |

Removing and installing components during servicing
Installing the optical drive
1
2
2
1
►
Slide the drive into the notebook (1).
►
Fasten the screws (2).
►
Complete the removal, see
"
F
i
n
i
s
h
i
n
g
c
o
m
p
o
n
e
n
t
r
e
m
o
v
a
l
"
,
P
a
g
e
6
5
.
Finishing component removal
After you have removed or changed the system components as you required, please
prepare your device for operation again as follows:
►
Install the battery again (see
"
I
n
s
t
a
l
l
i
n
g
a
b
a
t
t
e
r
y
"
,
P
a
g
e
3
3
).
►
Turn the notebook the right way up again and place it on a
fl
at surface.
►
Reconnect the cables that you disconnected before.
Fujitsu Technology Solutions
65