Garmin Edge 520 Owners Manual - Page 10
Setting a Training Target, Personal Records, Training Zones, Training Indoors, Locations, Zooming - navigation
 |
View all Garmin Edge 520 manuals
Add to My Manuals
Save this manual to your list of manuals |
Page 10 highlights
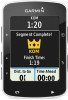
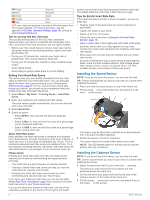
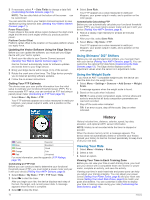
2 Select or to set the resistance force applied by the trainer. 3 Select an activity profile. 4 Start pedaling. 5 If necessary, select > Set Resistance to adjust the resistance during your activity. Setting Target Power 1 Select Menu > Training > Indoor Trainer > Set Target Power. 2 Set the target power value. 3 Select an activity profile. 4 Start pedaling. The resistance force applied by the trainer is adjusted to maintain a constant power output based on your speed. 5 If necessary, select > Set Target Power to adjust the target power output during your activity. Setting a Training Target The training target feature works with the Virtual Partner feature so you can train toward a set distance, distance and time, or distance and speed goal. During your training activity, the device gives you real-time feedback about how close you are to achieving your training target. 1 Select Menu > Training > Set a Target. 2 Select an option: • Select Distance Only to select a preset distance or enter a custom distance. • Select Distance and Time to select a distance and time target. • Select Distance and Speed to select a distance and speed target. The training target screen appears indicating your estimated finish time. The estimated finish time is based on your current performance and the time remaining. 3 Select to start the timer. 4 If necessary, select to view the Virtual Partner screen. 5 After you complete your activity, select > Save Ride. Cancelling a Training Target Select > Cancel Target > OK. Personal Records When you complete a ride, the device displays any new personal records you achieved during that ride. Personal records include your fastest time over a standard distance, longest ride, and most ascent gained during a ride. Viewing Your Personal Records Select Menu > My Stats > Personal Records. Reverting a Personal Record You can set each personal record back to the one previously recorded. 1 Select Menu > My Stats > Personal Records. 2 Select a record to revert. 3 Select Previous Record > OK. NOTE: This does not delete any saved activities. Deleting All Personal Records Select Menu > My Stats > Personal Records > Delete All > OK. NOTE: This does not delete any saved activities. • Power zones (Setting Your Power Zones, page 9) Training Indoors You can turn off GPS when you are training indoors or to save battery life. NOTE: Any change to the GPS setting is saved to the active profile. You can create customized activity profiles for each type of biking (Updating Your Activity Profile, page 13). 1 Select Menu > Settings > Activity Profiles. 2 Select a profile. 3 Select GPS Mode > Off. When GPS is turned off, speed and distance are not available unless you have an optional sensor that sends speed and distance data to the device (such as a speed or cadence sensor). Navigation Navigation features and settings also apply to navigating courses (Courses, page 3) and segments (Segments, page 4). • Locations (Locations, page 6) • Map settings (Map Settings, page 13) Locations You can record and store locations in the device. Marking Your Location Before you can mark a location, you must locate satellites. A location is a point that you record and store in the device. If you want to remember landmarks or return to a certain spot, you can mark a location. 1 Go for a ride. 2 Select > Mark Location > OK. Navigating to a Saved Location Before you can navigate to a saved location, you must locate satellites. 1 Select Menu > Training > Locations. 2 Select a location. 3 Select View Map. 4 Select Ride. Editing Locations 1 Select Menu > Training > Locations. 2 Select a location. 3 Select a location detail. For example, select Change Elevation to enter a known altitude for the location. 4 Edit the value, and select . Deleting a Location 1 Select Menu > Training > Locations. 2 Select a location. 3 Select Delete Location > OK. Setting Your Elevation If you have accurate elevation data for your present location, you can manually calibrate the altimeter on your device. 1 Go for a ride. 2 Select > Set Elevation. 3 Enter the elevation, and select . Training Zones • Heart rate zones (Setting Your Heart Rate Zones, page 8) Zooming the Map 1 Go for a ride. 6 Navigation
-
 1
1 -
2
-
3
-
4
-
 5
5 -
 6
6 -
 7
7 -
 8
8 -
 9
9 -
 10
10 -
 11
11 -
 12
12 -
 13
13 -
 14
14 -
 15
15 -
16
-
17
-
18
-
19
-
20
-
21
-
22
-
23
-
24
-
25
-
26
 |
 |