Garmin GPSMAP 5212 Installation Instructions - Page 1
Garmin GPSMAP 5212 - Marine GPS Receiver Manual
 |
UPC - 753759066109
View all Garmin GPSMAP 5212 manuals
Add to My Manuals
Save this manual to your list of manuals |
Page 1 highlights
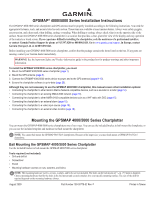
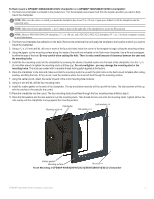
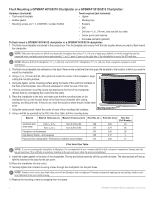
GPSMAP® 4000/5000 Series Installation Instructions The GPSMAP 4000/5000 series chartplotter and GPS antenna must be properly installed according to the following instructions. You need the appropriate fasteners, tools, and mounts listed in each section. These items are available at most marine dealers. Always wear safety goggles, ear protection, and a dust mask when drilling, cutting, or sanding. When drilling or cutting, always check what is on the opposite side of the surface. Mount the GPSMAP 4000/5000 series chartplotter in a location that provides a clear, glare-free view of the display and easy operation of the controls or touch screen. If you experience difficulty installing the chartplotter, seek the assistance of a professional installer; or contact Garmin Product Support by phone at 913/397.8200 or 800/800.1020. Go to www.garmin.com/support. In Europe, contact Garmin (Europe) Ltd. at 44/0870.8501241. Before installing your GPSMAP 4000/5000 series chartplotter, confirm that the package contains the items listed on the box. If any parts are missing, contact your Garmin dealer immediately. WARNING: See the Important Safety and Product Information guide in the product box for product warnings and other important information. To install the GPSMAP 4000/5000 series chartplotter, you must: 1. Mount the GPSMAP 4000/5000 series chartplotter (page 1). 2. Mount the GPS antenna (page 5). 3. Connect the GPSMAP 4000/5000 series device to power and to the GPS antenna (pages 9-10). 4. Ensure the chartplotter software is up-to-date (page 20). Although they are not necessary to use the GPSMAP 4000/5000 chartplotter, this manual covers other installation options: • Connecting the chartplotter to other Garmin Marine Network compatible devices, such as a sounder or a radar (page 12). • Connecting the chartplotter to an existing NMEA 2000 network (page 10). • Connecting the chartplotter to other NMEA 0183-compatible devices such as a VHF radio with DSC (page 15). • Connecting the chartplotter to an external alarm (page 18). • Connecting the chartplotter to a video input source (page 19). • Connecting the chartplotter to an external video monitor (page 19). Mounting the GPSMAP 4000/5000 Series Chartplotter You can mount the GPSMAP 4000/5000 series chartplotters one of two ways. You can use the included bracket to bail mount the chartplotter, or you can use the included template and hardware to flush mount the chartplotter. Note: You cannot bail mount the GPSMAP 5015/5215 chartplotters. Because of the larger size, you must flush mount a GPSMAP 5015/5215 chartplotter. Bail Mounting the GPSMAP 4000/5000 Series Chartplotter Use the included bracket to bail mount the GPSMAP 4000/5000 series chartplotter. Tools required (not included): • Drill and drill bit • Screwdriver • Pencil • Mounting hardware (screws or nuts, washers, and bolts) Note: The mounting hardware (screws or nuts, washers, and bolts) are not included. The holes on the bail mount are 5/16 in. (7.9 mm) in diameter. Choose mounting hardware that fits the holes in the bail mount and securely attaches it to your specific mounting surface. The size of the drill bit required depends on the mounting hardware chosen. August 2009 Part Number 190-00779-02 Rev. F Printed in Taiwan
-
 1
1 -
 2
2 -
 3
3 -
 4
4 -
 5
5 -
 6
6 -
 7
7 -
8
-
9
-
10
-
11
-
12
-
13
-
14
-
15
-
16
-
17
-
18
-
19
-
20
-
21
-
22
-
23
-
24
 |
 |