Garmin Geko 201 Owner's Manual - Page 29
To activate a route, To remove a waypoint from the 'ROUTES' list, To clear all route waypoints
 |
UPC - 753759042066
View all Garmin Geko 201 manuals
Add to My Manuals
Save this manual to your list of manuals |
Page 29 highlights
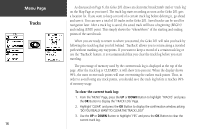
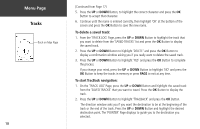
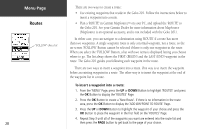
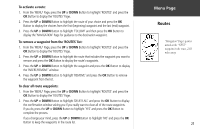
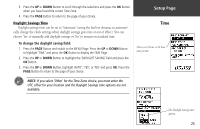
To activate a route: 1. From the 'MENU' Page, press the UP or DOWN Button to highlight 'ROUTES' and press the OK Button to display the 'ROUTES' Page. 2. Press the UP or DOWN Button to highlight the route of your choice and press the OK Button to display the choices from the first (beginning) waypoint and the last (end) waypoint. 3. Press the UP or DOWN Button to highlight 'FOLLOW' and then press the OK Button to display the 'NAVIGATION' Page for guidance to the destination waypoint. To remove a waypoint from the 'ROUTES' list: 1. From the 'MENU' Page, press the UP or DOWN Button to highlight 'ROUTES' and press the OK Button to display the 'ROUTES' Page. 2. Press the UP or DOWN Button to highlight the route that includes the waypoint you want to remove and press the OK Button to display the route's waypoints. 3. Press the UP or DOWN Button to highlight the waypoint and press the OK Button to display the 'INSERT/REMOVE' window. 4. Press the UP or DOWN Button to highlight 'REMOVE' and press the OK Button to remove the waypoint from the list. To clear all route waypoints: 1. From the 'MENU' Page, press the UP or DOWN Button to highlight 'ROUTES' and press the OK Button to display the 'ROUTES' Page. 2. Press the UP or DOWN Button to highlight 'DELETE ALL' and press the OK Button to display the confirmation window asking you if you really want to clear all of the route waypoints. If you do, press the UP or DOWN Button to highlight 'YES' and press the OK Button to complete the process. If you change your mind, press the UP or DOWN Button to highlight 'NO' and press the OK Button to keep the waypoints in the route list. Menu Page Routes "Navigation" Page's pointer aimed at the "NEXT" waypoint in the route, 2.83 miles away. 21
-
 1
1 -
2
-
3
-
4
-
5
-
6
-
7
-
8
-
9
-
10
-
11
-
12
-
13
-
14
-
15
-
16
-
17
-
18
-
19
-
20
-
21
-
22
-
23
-
 24
24 -
 25
25 -
 26
26 -
 27
27 -
 28
28 -
 29
29 -
 30
30 -
 31
31 -
 32
32 -
 33
33 -
 34
34 -
35
-
36
-
37
-
38
-
39
-
40
-
41
-
42
-
43
-
44
-
45
-
46
-
47
-
48
-
49
-
50
-
51
-
52
 |
 |
