Garmin STRIKER 4 Owners Manual - Page 8
Adjusting the Range of the Depth Scale, Adjusting the Zoom, Setting the Bottom Search Limit, Sonar - installation
 |
View all Garmin STRIKER 4 manuals
Add to My Manuals
Save this manual to your list of manuals |
Page 8 highlights
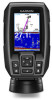
• To display lower-sensitivity sonar returns with less noise automatically, select Auto Low. Hiding Surface Noise You can hide or display the sonar returns near the surface of the water. Hiding surface noise helps reduce screen clutter. NOTE: Setting the surface noise to show or hide on one screen applies that setting to all screens. This feature may not be available with all transducers. From a sonar screen, select > Sonar Setup > Noise Reject > Surface Noise. Interference The Interference setting adjusts sonar sensitivity to reduce the effects of interference from nearby sources of noise. When you adjust the interference setting from off through low À , medium , and high , noise is gradually removed, but Á Â Ã there is little effect on the strong target returns. Use the lowest interference setting that achieves the desired improvement to remove interference from the screen. Correcting installation issues that cause noise is the best way to eliminate interference. Setting the Interference 1 From a sonar screen, select Reject > Interference. 2 Select an option. > Sonar Setup > Noise Adjusting the Range of the Depth Scale You can adjust the range of the depth scale that appears on the right side of the screen. Automatic ranging keeps the bottom within the lower third of the sonar screen, and can be useful for tracking the bottom where there are slow or moderate terrain changes. When the depth changes dramatically, like a drop off or cliff, manually adjusting the range allows a view of a specified depth range. The bottom is shown on the screen as long as the bottom is anywhere within the manual range established. 1 From a sonar screen, select > Range. 2 Select an option: • To allow the device to adjust the range automatically based on the depth, select Auto. • To increase or decrease the range manually, select or . (Available only on the 5 in. and 7 in. models.) • To increase or decrease the range manually, select or . (Available only on the 4 in. models.) NOTE: From a sonar screen, select and to quickly manually adjust the range. (Available only on the 5 in. and 7 in. models.) From a sonar screen, select and to quickly resume auto range. (Available only on the 5 in. and 7 in. models.) From a sonar screen, select or to quickly adjust the range. (Available only on the 4 in. models.) Setting the range on one screen applies that setting to all screens. Adjusting the Zoom You can adjust the zoom manually by specifying the span and a fixed starting depth. For example, when the depth is 15 m and the starting depth is 5 m, the device displays a magnified area from 5 to 20 m deep. You also can allow the device to adjust the zoom automatically by specifying a span. The device calculates the zoom area from the bottom of the water. For example, if you select a span of 10 m, the device displays an magnified area from the bottom of the water to 10 m above the bottom. 1 From a sonar screen, select > Zoom. 2 Select an option: • Select Bottom Lock to lock the screen to the water bottom. • Select Manual to manually set the zoom. • Select Auto to automatically set the zoom. • Select Split Zoom to turn on the split-zoom view. Locking the Screen to the Water Bottom You can lock the screen to the water bottom. For example, if you select a span of 20 meters, the device shows an area from the water bottom to 20 meters above the bottom. The span appears on the right side. 1 From a sonar view, select > Zoom > Bottom Lock. 2 Select a span. Setting the Bottom Search Limit You can set a maximum depth at which the auto range feature searches for the bottom. A lower limit acquires data about the bottom faster than a higher limit. 1 From a sonar screen, select > Sonar Setup > Bottom Search Limit. 2 Select a range. Sonar Frequencies NOTE: The frequencies that are available depend on the transducer being used. Adjusting the frequency helps adapt the sonar for your particular goals and the present depth of the water. Selecting Frequencies NOTE: You cannot adjust the frequency for all sonar views and transducers. You can indicate which frequencies appear on the sonar screen. 1 From a sonar view, select > Frequency. 2 Select a frequency suited to your needs and water depth. For more information on frequencies, see Sonar Frequencies, page 4. Creating a Frequency Preset NOTE: Not available with all transducers. You can create a preset to save a specific sonar frequency, which allows you to change frequencies quickly. 1 From a sonar view, select > Frequency. 2 Select Add. 3 Enter a frequency. Setting the Scroll Speed You can set the rate at which the sonar image moves across the screen. A higher scroll speed shows more detail, especially while moving or trolling. A lower scroll speed displays sonar information on the screen longer. Setting the scroll speed on one sonar view applies to all the sonar views. 4 Sonar
-
 1
1 -
2
-
 3
3 -
 4
4 -
 5
5 -
 6
6 -
 7
7 -
 8
8 -
 9
9 -
 10
10 -
 11
11 -
 12
12 -
 13
13 -
14
-
15
-
16
 |
 |