Garmin fenix 6 - Pro Solar Edition Owners Manual - Page 12
Golfing
 |
View all Garmin fenix 6 - Pro Solar Edition manuals
Add to My Manuals
Save this manual to your list of manuals |
Page 12 highlights
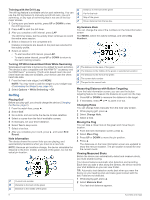
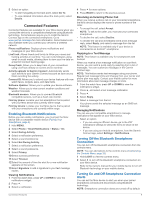
Training with the Drill Log The drill log feature is available only for pool swimming. You can use the drill log feature to manually record kick sets, one-arm swimming, or any type of swimming that is not one of the four major strokes. 1 During your pool swim activity, press UP or DOWN to view the drill log screen. 2 Press LAP to start the drill timer. 3 After you complete a drill interval, press LAP. The drill timer stops, but the activity timer continues to record the entire swim session. 4 Select a distance for the completed drill. Distance increments are based on the pool size selected for the activity profile. 5 Select an option: • To start another drill interval, press LAP. • To start a swim interval, press UP or DOWN to return to the swim training screens. Turning Off Wrist-based Heart Rate While Swimming Wrist-based heart rate is turned on by default for swim activities. The device is also compatible with the HRM-Tri™ accessory and the HRM-Swim™ accessory. If both wrist-based heart rate and chest heart rate data are available, your device uses the chest heart rate data. 1 From the heart rate widget, hold MENU. NOTE: You may need to add the widget to your widget loop (Customizing the Widget Loop, page 34). 2 Select Options > While Swimming > Off. Golfing Playing Golf Before you play golf, you should charge the device (Charging the Device, page 2). 1 From the watch face, press . 2 Select Golf. 3 Go outside, and wait while the device locates satellites. 4 Select a course from the list of available courses. 5 If necessary, set your driver distance. 6 Select Yes to keep score. 7 Select a tee box. 8 After you complete your round, press , and select End Round. Hole Information The device shows the current hole you are playing, and automatically transitions when you move to a new hole. NOTE: Because pin locations change, the device calculates the distance to the front, middle, and back of the green, but not the actual pin location. Current hole number Distance to the back of the green Distance to the middle of the green Distance to the front of the green Par for the hole Map of the green Driver distance from the tee box Big Numbers Mode You can change the size of the numbers on the hole information screen. Hold MENU, select the activity settings, and select Big Numbers. The distance to the back of the green The distance to the middle of the green or selected pin position The distance to the front of the green The current hole number The par for the current hole Measuring Distance with Button Targeting From the hole information screen, you can use the button targeting feature to measure the distance to a point on the map. 1 Press UP or DOWN to measure the distance to the target. 2 If necessary, select or to zoom in or out. Changing Holes You can change holes manually from the hole view screen. 1 While playing golf, press . 2 Select Change Hole. 3 Select a hole. Moving the Flag You can take a closer look at the green and move the pin location. 1 From the hole information screen, press . 2 Select Move Flag. 3 Press UP or DOWN to move the pin position. 4 Press . The distances on the hole information screen are updated to show the new pin location. The pin location is saved for only the current round. Viewing Measured Shots Before the device can automatically detect and measure shots, you must enable scoring. Your device features automatic shot detection and recording. Each time you take a shot along the fairway, the device records your shot distance so you can view it later. TIP: Automatic shot detection works best when you wear the device on your leading wrist and make good contact with the ball. Putts are not detected. 1 While playing golf, press . 2 Select Measure Shot. Your last shot distance appears. 6 Activities and Apps
-
 1
1 -
2
-
3
-
4
-
5
-
6
-
 7
7 -
 8
8 -
 9
9 -
 10
10 -
 11
11 -
 12
12 -
 13
13 -
 14
14 -
 15
15 -
 16
16 -
 17
17 -
18
-
19
-
20
-
21
-
22
-
23
-
24
-
25
-
26
-
27
-
28
-
29
-
30
-
31
-
32
-
33
-
34
-
35
-
36
-
37
-
38
-
39
-
40
-
41
-
42
-
43
-
44
-
45
-
46
-
47
-
48
-
49
-
50
-
51
-
52
-
53
-
54
-
55
-
56
-
57
-
58
 |
 |
