Gateway DX4300 Gateway Desktop User's Guide - Page 13
Front - 22
 |
View all Gateway DX4300 manuals
Add to My Manuals
Save this manual to your list of manuals |
Page 13 highlights
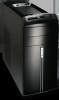
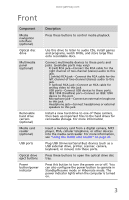
www.gateway.com Front Component Media navigation interface (optional) Optical disc drive Multimedia panel (optional) Removable hard drive carriers (optional) Media card reader (optional) USB ports Optical drive eject buttons Power button/power indicator Description Press these buttons to control media playback. Use this drive to listen to audio CDs, install games and programs, watch DVDs, and store large files onto recordable discs. Connect multimedia devices to these ports and jacks. (available ports may vary) ■ R (red) RCA jack-Connect the RCA cable for the right channel of two-channel (stereo) audio to this jack. ■ L (white) RCA jack-Connect the RCA cable for the left channel of two-channel (stereo) audio to this jack. ■ V (yellow) RCA jack-Connect an RCA cable for analog video to this jack. ■ USB ports-Connect USB devices to these ports. ■ IEEE 1394 (FireWire) port-Connect an IEEE 1394 device to this port. ■ Microphone jack-Connect an external microphone to this jack. ■ Headphone jack-Connect headphones or external speakers to this jack. Install a new hard drive to one of these carriers, then back up important files to the hard drives for removable storage. For more information. Insert a memory card from a digital camera, MP3 player, PDA, cellular telephone, or other devices into the media card reader. For more information, see "Using the media card reader" on page 22. Plug USB (Universal Serial Bus) devices (such as a USB external drive, printer, scanner, camera, keyboard, or mouse) into these ports. Press these buttons to open the optical drive disc tray. Press this button to turn the power on or off. You can also configure the power button to operate in Standby/Resume mode or Hibernate mode. The power indicator lights when the computer is turned on. 3
-
 1
1 -
2
-
3
-
4
-
5
-
6
-
7
-
 8
8 -
 9
9 -
 10
10 -
 11
11 -
 12
12 -
 13
13 -
 14
14 -
 15
15 -
 16
16 -
 17
17 -
 18
18 -
19
-
20
-
21
-
22
-
23
-
24
-
25
-
26
-
27
-
28
-
29
-
30
-
31
-
32
-
33
-
34
-
35
-
36
-
37
-
38
-
39
-
40
-
41
-
42
-
43
-
44
-
45
-
46
-
47
-
48
-
49
-
50
-
51
-
52
-
53
-
54
-
55
-
56
-
57
-
58
-
59
-
60
-
61
-
62
-
63
-
64
-
65
-
66
-
67
-
68
-
69
-
70
-
71
-
72
-
73
-
74
-
75
-
76
-
77
-
78
-
79
-
80
-
81
-
82
 |
 |
