Gateway DX4300 Gateway Desktop User's Guide - Page 67
Edit titles and other, information
 |
View all Gateway DX4300 manuals
Add to My Manuals
Save this manual to your list of manuals |
Page 67 highlights
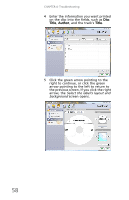
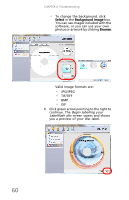
www.gateway.com To create a Labelflash label: 1 Insert an unlabeled Labelflash disc into your recordable disc drive, label side down. Although usually you will have already recorded files to the disc, it is not necessary to do that step first. To determine whether the recordable disc is Labelflash compatible, see the disc package's description. 2 Click (Start), All Programs, CyberLink LabelPrint, then click LabelPrint. The LabelPrint program starts. 3 Click LabelFlash, then click the green arrow (in the lower-right corner) to continue. The Edit titles and other information screen opens. 57
-
 1
1 -
2
-
3
-
4
-
5
-
6
-
7
-
8
-
9
-
10
-
11
-
12
-
13
-
14
-
15
-
16
-
17
-
18
-
19
-
20
-
21
-
22
-
23
-
24
-
25
-
26
-
27
-
28
-
29
-
30
-
31
-
32
-
33
-
34
-
35
-
36
-
37
-
38
-
39
-
40
-
41
-
42
-
43
-
44
-
45
-
46
-
47
-
48
-
49
-
50
-
51
-
52
-
53
-
54
-
55
-
56
-
57
-
58
-
59
-
60
-
61
-
 62
62 -
 63
63 -
 64
64 -
 65
65 -
 66
66 -
 67
67 -
 68
68 -
 69
69 -
 70
70 -
 71
71 -
 72
72 -
73
-
74
-
75
-
76
-
77
-
78
-
79
-
80
-
81
-
82
 |
 |

www.gateway.com
57
To create a Labelflash label:
1
Insert an unlabeled Labelflash disc into
your recordable disc drive, label side
down
. Although usually you will have
already recorded files to the disc, it is not
necessary to do that step first.
To determine whether the recordable
disc is Labelflash compatible, see the disc
package’s description.
2
Click
(
Start
),
All Programs
,
CyberLink
LabelPrint
, then click
LabelPrint
. The
LabelPrint program starts.
3
Click
LabelFlash
, then click the green
arrow (in the lower-right corner) to
continue. The
Edit titles and other
information
screen opens.