Gateway DX4320 Hardware Installation Guide - Page 48
To partition your drive with FAT32:, Setting up the New Drive Manually
 |
View all Gateway DX4320 manuals
Add to My Manuals
Save this manual to your list of manuals |
Page 48 highlights
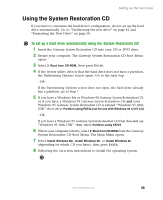
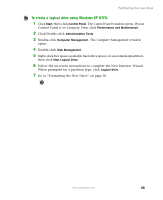
Chapter 6: Setting up the New Drive Manually 7 If the new hard drive is a master (boot) drive, type 1 for the Fixed hard drive Number. - OR - If the new hard drive is a slave drive, type 2 for the Fixed hard drive Number. 8 Press ENTER. The FDISK Options menu appears with the appropriate drive selected as the current fixed drive. 9 Type 1, then press ENTER. The Create Dos Partition or Logical DOS Drive menu opens. 10 Type 1, then press ENTER. The Create Primary DOS Partition screen appears and your computer verifies the drive integrity. 11 Type Y, then press ENTER. The message Primary DOS Partition created, drive letters changed or added appears. 12 Press ESC. 13 Go to "Creating the extended partition" on page 46. To partition your drive with FAT32: 1 Insert the System Restoration Kit CD or System Restoration CD into your CD or DVD drive. 2 Restart your computer. The Main menu opens. 3 Close the Main menu. 4 Type fdisk, then press ENTER. 5 Type Y. Large disk support is enabled. 6 If you have only one hard drive in your computer, go to Step 8. - OR - If you have more than one hard drive in your computer type 5, then press ENTER. The Change Current Fixed Disk Drive window appears showing drive availability and status. 44 www.gateway.com
-
 1
1 -
2
-
3
-
4
-
5
-
6
-
7
-
8
-
9
-
10
-
11
-
12
-
13
-
14
-
15
-
16
-
17
-
18
-
19
-
20
-
21
-
22
-
23
-
24
-
25
-
26
-
27
-
28
-
29
-
30
-
31
-
32
-
33
-
34
-
35
-
36
-
37
-
38
-
39
-
40
-
41
-
42
-
 43
43 -
 44
44 -
 45
45 -
 46
46 -
 47
47 -
 48
48 -
 49
49 -
 50
50 -
 51
51 -
 52
52 -
 53
53 -
54
-
55
-
56
-
57
-
58
-
59
-
60
-
61
-
62
-
63
-
64
 |
 |
