GE 27958GE1 User Guide - Page 11
Telephone Set Up - a
 |
UPC - 044319202373
View all GE 27958GE1 manuals
Add to My Manuals
Save this manual to your list of manuals |
Page 11 highlights
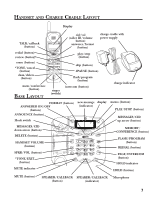
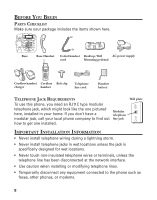
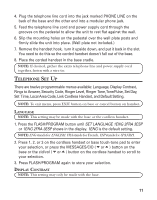
4. Plug the telephone line cord into the jack marked PHONE LINE on the back of the base and the other end into a modular phone jack. 5. Feed the telephone line cord and power supply cord through the grooves on the pedestal to allow the unit to rest flat against the wall. 6. Slip the mounting holes on the pedestal over the wall plate posts and firmly slide the unit into place. (Wall plate not included.) 7. Remove the handset hook, turn it upside down, and put it back in the slot. You need to do this so the corded handset doesn't fall out of the base. 8. Place the corded handset in the base cradle. NOTE: If desired, gather the extra telephone line and power supply cord together, fasten with a wire tie. TELEPHONE SET UP There are twelve programmable menus available: Language, Display Contrast, Rings to Answer, Security Code, Ringer Level, Ringer Tone,Tone/Pulse, Set Day, Set Time, Local Area Code, Link Cordless Handset, and Default Setting. NOTE: To exit menu, press EXIT button on base or cancel button on handset. LANGUAGE NOTE: This setting may be made with the base or the cordless handset. 1. Press the FLASH/PROGRAM button until SET LANGUAGE 1ENG 2FRA 3ESP or 1ENG 2FRA 3ESP shows in the display. 1ENG is the default setting. NOTE: ENG stands for ENGLISH. FRA stands for French. ESP stands for SPANISH. 2. Press 1, 2, or 3 on the cordless handset or base touch-tone pad to enter your selection, or press the MESSAGES/CID ( or ) button on the base or the cid/vol ( or ) button on the cordless handset to scroll to your selection. 3. Press FLASH/PROGRAM again to store your selection. DISPLAY CONTRAST NOTE: This setting may only be made with the base. 11
-
 1
1 -
2
-
3
-
4
-
5
-
 6
6 -
 7
7 -
 8
8 -
 9
9 -
 10
10 -
 11
11 -
 12
12 -
 13
13 -
 14
14 -
 15
15 -
 16
16 -
17
-
18
-
19
-
20
-
21
-
22
-
23
-
24
-
25
-
26
-
27
-
28
-
29
-
30
-
31
-
32
-
33
-
34
-
35
-
36
-
37
-
38
-
39
-
40
-
41
-
42
-
43
-
44
-
45
-
46
-
47
-
48
-
49
-
50
-
51
-
52
-
53
-
54
-
55
-
56
-
57
-
58
-
59
-
60
-
61
-
62
-
63
-
64
-
65
-
66
-
67
-
68
-
69
-
70
-
71
-
72
-
73
-
74
-
75
-
76
-
77
-
78
-
79
-
80
-
81
-
82
-
83
-
84
-
85
-
86
-
87
-
88
-
89
-
90
-
91
-
92
-
93
-
94
-
95
-
96
 |
 |