Genie PowerLift Excelerator Owner's Manual
Genie PowerLift Excelerator Manual
 |
View all Genie PowerLift Excelerator manuals
Add to My Manuals
Save this manual to your list of manuals |
Genie PowerLift Excelerator manual content summary:
- Genie PowerLift Excelerator | Owner's Manual - Page 1
Contents Safety Information 2 Important Installation Instructions 2 Safety Features 2 Pre-installation Checklist 3 Garage Door Opener Assembly 9 Record Data (for Service 11 Garage Door Opener Installation 12 Accessories 22 Maintenance 23 Troubleshooting Guide 24 Wiring Diagram 27 Warranty - Genie PowerLift Excelerator | Owner's Manual - Page 2
height of 5', so small children cannot reach it Away from all moving parts of the garage door. Manual Emergency Release Allows the garage door to be opened or closed manually for emergencies or maintenance. 7 Install the entrapment WARNING label next to the Wall Console - Genie PowerLift Excelerator | Owner's Manual - Page 3
by a Genie Factory Authorized Dealer. Door springs, cables, pulleys, brackets and associated hardware are under extreme tension and can cause serious injury or death. NOTE The Excelerator Opener is equipped with an Automatic Garage Door Balance Detection System. See Troubleshooting Guide on page - Genie PowerLift Excelerator | Owner's Manual - Page 4
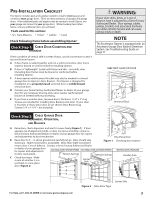
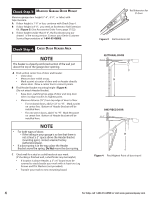
than 8'-0", the Excelerator you pur chased is the wrong version. Contact your Genie Customer Service Representative at 1-800-35-GENIE. Ch ec k Ste p 4: Check Door Header Area NOTE The header is a heavily reinforced section of the wall just above the top of the garage door opening. A Find - Genie PowerLift Excelerator | Owner's Manual - Page 5
Opener Power Head will be and estimate type and quantity of materials needed for your installation (Figure 6). 120 Volt grounded outlet or wiring box within 3 feet of Power Head. 10' for 7-1/2' doors 11' for 8' doors Door Center Line Figure 5 Check Power Head location Mounting Straps Support - Genie PowerLift Excelerator | Owner's Manual - Page 6
are removed from the garage door before starting the installation. A If your garage does not have a separate entry door, it is highly recommended to install a Genie Emergency Release Kit (GER-2). Emergency Release Kit lets you open garage door from outside if there is a power failure. (Please see - Genie PowerLift Excelerator | Owner's Manual - Page 7
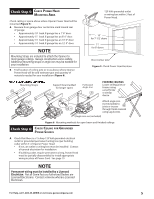
/model Safety & Maintenance Guide (manual)(main carton) 1 1 Part Name Lens Top Plate Assembly Light Socket (2) Motor Assembly Cover Motor Drive Board Controller Board # 10-24 x 3/8" Hex Head # 8-32 x 1" Phillips Screw # 8-32 x 3/8" Slotted Hex Head Screw Power Cord For Help, call 1-800-35-GENIE - Genie PowerLift Excelerator | Owner's Manual - Page 8
Excelerator Hardware Exploded View NOTE Opener will not function unless Safe-T-Beam® System is installed and Force Controls are properly set. One-Piece Rail Assembly (Genie Pro only) for 10' or 12' door includes: • Special "Close" Limit Switch with longer Wires. • 96" Emergency Release Cord (yellow - Genie PowerLift Excelerator | Owner's Manual - Page 9
Garage Door Opener Assembly A ssembly Step C1h: Connect Rail to Power Head OPEN BLUE PARTS BAG A Turn Power Head upside down and place on a flat level surface. B Install Coupler on Motor Shaft (Figure 9). CAUTION The Drive Screw and Rail Liner can slide out of Rail Sections. Keep Rail - Genie PowerLift Excelerator | Owner's Manual - Page 10
Rail Strap White Wire As se m b ly S te p C6h: Install and Connect Limit Switches OPEN GREEN PARTS BAG Open Limit Emergency Switch Assembly Release Knob Wire Clips A Turn Opener right side up and support Power Head to avoid damaging the Light Bulb Sockets. B Uncoil - Genie PowerLift Excelerator | Owner's Manual - Page 11
cord through knob and tie a knot in this end also. • Following installation of your garage door opener, adjust the height of the knob to no less than 6 feet above your sales receipt with this manual for future reference should service ever be required. For Help, call 1-800-35-GENIE or visit - Genie PowerLift Excelerator | Owner's Manual - Page 12
Point of door travel + 2-1/2" (sectional door) or + 6" (one-piece door) Figure 18 Attach Header Bracket above Garage Door A If needed, attach a 2" x 6" board (Figure 18) (also see page 4) with at least two (four is recommended) Lag Screws and Flat Washers (not supplied). OPEN ORANGE PARTS BAG - Genie PowerLift Excelerator | Owner's Manual - Page 13
In sta lla tio n SteCph2: Install Garage Door Bracket CAUTION Doors made of masonite, lightweight wood, fiberglass, metal, or other lightweight materials must be properly braced before mounting door Opener. For sectional doors: A Place Door Bracket on door center line, no lower than top - Genie PowerLift Excelerator | Owner's Manual - Page 14
the door to check. Adjust as needed. • Materials needed for mounting Opener Power Head to garage may vary. Read all instructions completely. • Garage constructions differ. Extra material may be needed. See Check Power Head Mounting Area on page 5. C Install Mounting Straps and/or support - Genie PowerLift Excelerator | Owner's Manual - Page 15
reach of children. If the Knob is pulled with garage door fully or partially open, garage door may close without warning! Clevis Pins Cotter Pins Safe-T-Beam® (STB) Brackets 3/8" x 7/8" Hex Head Bolts #10-16 x 11/4" Phillips Hex Head Screw 3/8" Hex Serrated Flange Nuts Hardware (yellow bag) As - Genie PowerLift Excelerator | Owner's Manual - Page 16
power to the Opener before installing Safe-T-Beam® System Wires. If Opener is plugged into outlet, Unplug it now. NOTE The Opener will not close the door automatically unless the Safe-T-Beam® System is installed. A Install Safe-T-Beam® Source and Sensor (Figure 24): • Mark both sides of garage - Genie PowerLift Excelerator | Owner's Manual - Page 17
. OPEN RED PARTS BAG C Install Safe -T-Beam® Wiring (Figure 27): • Route Wire and Insulated Staples (Figure 28 and Figure 29). - Securely fasten Wires with Insulated Staples as you go. Staples should be snug only. - Wires between garage wall and Power - Genie PowerLift Excelerator | Owner's Manual - Page 18
allows convenient manual control of Opener Lighting System. B Find a convenient mounting location: Within direct sight of garage door. At least 5' above floor (to prevent small children from operating garage door). Away from any moving garage door or Opener parts (you should - Genie PowerLift Excelerator | Owner's Manual - Page 19
into the outlet, contact a qualified electrician to install the proper outlet. Do Not change the Plug in any way. The door Opener must be properly grounded to prevent personal injury and damage to the components. • The electrical power to the door Opener Must Be removed when the Motor Cover is - Genie PowerLift Excelerator | Owner's Manual - Page 20
Safe-T-Beam® Troubleshooting Guide on pg. 26, and Opener System Self-diagnostic Troubleshooting on pg. 27. • Tighten Limit Switch Set Screw. Do not over-tighten (strip) Limit Switch Set Screw. C Adjust Open Limit Switch: • Press Wall Console to open garage door. - If door does not - Genie PowerLift Excelerator | Owner's Manual - Page 21
to Close Limit Switch. - If not, adjust Close Force Control slightly clockwise, open garage door, and close it again. • Repeat steps above until garage door runs smoothly from Open Limit Switch to Close Limit Switch. In s t a lla t ion S teCph10: Setting Contact Reverse - Genie PowerLift Excelerator | Owner's Manual - Page 22
Erase All Remotes from Power Head Memory A Press and hold Learn Button on Power Head for 10 door and door Opener Owner's Manuals before attempting any repairs. Remote Control Operation A Press Button on Remote Control. Garage door will move. B Press Button again. Garage door will stop: • The door - Genie PowerLift Excelerator | Owner's Manual - Page 23
Customer Service at 1-800-35-GENIE. B Yearly: • Wipe off old excess lubricant from Drive Screw. • Lubricate Drive Screw with Genie Lubricant (GLU-3) NOTE Use ONLY Genie Lubricant (GLU-3). Other lubricants may damage the Opener. GLU-3 Lubricant FCC AND IC CERTIFIED All devices comply with Part - Genie PowerLift Excelerator | Owner's Manual - Page 24
or death. 7 KEEP GARAGE DOORS PROPERLY BALANCED. See Owner's Manual. An improperly balanced door increases the risk of severe injury or death. Have a Genie Factory Authorized Dealer make repairs to cables, spring assemblies, and other hardware. 8 SAVE THESE INSTRUCTIONS. WARNING Use the Wall - Genie PowerLift Excelerator | Owner's Manual - Page 25
door - Fuse on Motor Drive Board. Safety Guide - Ribbon Cable on Motor Drive Board is properly inserted into Connector on Controller Board. Contact Customer service for further service. 2 BLINKS, Controller • Pause Board (Repeat) Interrupt • • Reset Opener - unplug (or disconnect power - Genie PowerLift Excelerator | Owner's Manual - Page 26
suspect a problem with the garage door hardware or springs, contact a Genie Factory Authorized Dealer for service, or contact Customer Service at 1-800-35-GENIE. Door will only run open • Check Safe-T-Beam® System as detailed in the Safe-T-Beam® System Self-diagnostic Troubleshooting Chart - Genie PowerLift Excelerator | Owner's Manual - Page 27
WARNING: If you suspect a problem with garage door hardware or springs, contact a Genie Factory Authorized Dealer for service, or contact Customer Service at 1-800-35-GENIE. Safe-T-Beam® System • • • If an operational problem exists, Opener will not run closed. Check - Genie PowerLift Excelerator | Owner's Manual - Page 28
• Door out of balance • Broken springs or cables • Power outages • Use of extension cords • Missing or damaged parts on discounted, clearanced, final sale or taped cartons • Phantom operations • Fire • Flood • Acts of God • Failure to follow the Owner's Manual 28 For Help, call 1-800-35-GENIE - Genie PowerLift Excelerator | Owner's Manual - Page 29
de 8 pies (2,43 m.) Nécessaire de rallonge du Excelerator Screw Drive - Rallonge de 30 dm (18 po) prolongeant la course de l'ouvre-porte Screw Drive pour une porte de 2,4 m (8 pi) de hauteur (GIRU-1T) Universal Conversion Kit - Converts any Garage Door Opener to a secure radio signal system. Kit - Genie PowerLift Excelerator | Owner's Manual - Page 30
® Garage Door Opener Accessories Order Form Formulario de pedido de accesorios para abridores de puertas de garaje Formulaire de commande des accessoires pour ouvre-porte de garage MODEL MODELO MODÈLE DESCRIPTION DESCRIPCIÓN DESCRIPTION PRODUCT CODE PRICE (US$)* QTY. CÓDIGO PRECIO* CANTIDAD
-
 1
1 -
 2
2 -
 3
3 -
 4
4 -
 5
5 -
 6
6 -
 7
7 -
8
-
9
-
10
-
11
-
12
-
13
-
14
-
15
-
16
-
17
-
18
-
19
-
20
-
21
-
22
-
23
-
24
-
25
-
26
-
27
-
28
-
29
-
30
 |
 |

For 7’ 6” Doors. Extension Kit is available for 8’ Doors
Included Wall Console MUST be installed prior to Operation
of this Garage Door Opener.
Safe-T-Beam
®
Safety Reverse System MUST be Installed and
the Force Controls MUST be Properly set to close door.
This Equipment meets or exceeds all Federal, State and UL 325
Safety Requirements.
Will not operate “twice as fast” on one-piece doors.
3531836147
SAVE THIS MANUAL FOR
FUTURE REFERENCE
C
OMPLETE
WITH
INTELLICODE®
R
EMOTE
C
ONTROL
AND
SERIES II
E
LECTRONICS
Having Difficulty? Need Help?
Please call us: 1-800-35-GENIE (354-3643)
www.geniecompany.com
Please have Model information ready when calling
.
Safety Information ° ° ° ° ° ° ° ° ° ° ° ° ° ° ° ° ° ° ° ° ° ° 2
Important Installation Instructions° ° ° ° ° ° ° 2
Safety Features ° ° ° ° ° ° ° ° ° ° ° ° ° ° ° ° ° ° ° ° ° ° ° ° ° 2
Pre-installation Checklist ° ° ° ° ° ° ° ° ° ° ° ° ° ° ° ° 3
Garage Door Opener Assembly ° ° ° ° ° ° ° ° ° ° 9
Record Data (for Service) ° ° ° ° ° ° ° ° ° ° ° ° ° °
11
Garage Door Opener Installation ° ° ° ° ° ° ° 12
Accessories ° ° ° ° ° ° ° ° ° ° ° ° ° ° ° ° ° ° ° ° ° ° ° ° ° ° °
22
Maintenance° ° ° ° ° ° ° ° ° ° ° ° ° ° ° ° ° ° ° ° ° ° ° ° ° ° ° 23
Troubleshooting Guide ° ° ° ° ° ° ° ° ° ° ° ° ° ° °
24
Wiring Diagram ° ° ° ° ° ° ° ° ° ° ° ° ° ° ° ° ° ° ° ° ° ° °
27
Warranty information ° ° ° ° ° ° ° ° ° ° ° ° ° ° ° ° ° ° 28
T
ABLE
OF
C
ONTENTS