Genie PowerLift Excelerator Owner's Manual - Page 13
Installation Step 2, Installation Step 3
 |
View all Genie PowerLift Excelerator manuals
Add to My Manuals
Save this manual to your list of manuals |
Page 13 highlights
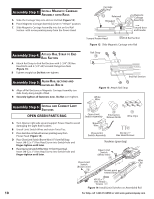
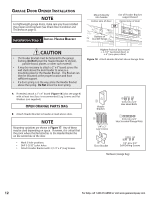
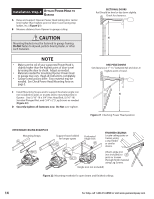
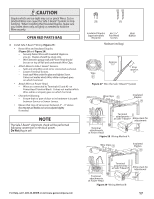
In sta lla tio n SteCph2: Install Garage Door Bracket CAUTION Doors made of masonite, lightweight wood, fiberglass, metal, or other lightweight materials must be properly braced before mounting door Opener. For sectional doors: A Place Door Bracket on door center line, no lower than top roller, and mark holes (Figure 19). B Attach Door Bracket: • For metal doors, use 3 (1/4" -20 x 3/4") Self-Drilling Screws (provided). • For wood doors, use 3 (1/4" x 2") Lag Screws or 3 (1/4" x 1-1/4") Lag Screws (not provided). NOTE Before installing, check length of the included Lag Screws vs. the thickness of your garage door. For doors thinner than 2", use 1-1/4" Lag Screws. Check door condition and thickness. See page 3. SECTIONAL DOORS ONE-PIECE DOORS Center Line of door Center Line of door Attach no lower than top rollers Attach at highest point on door Optional Door Operator Bracket (not included) Figure 19 Attach Door Bracket For one-piece doors: A Position Door Bracket on door's center line, as high as possible or on top of door. B Attach Door Bracket: • For metal doors, use 3 (1/4" -20 x 3/4") Self-Drilling Screws. (provided) • For wood doors, use 3 (1/4" x 2") Lag Screws. (provided) In s ta lla t ion S teCph3: Attach Rail to Header Bracket A While supporting the Power Head, place threaded end of Rail Strap Bolt through Header Bracket hole (Figure 20). B Attach (5/16"-18) Flange Nut to Rail Strap Bolt. Finger-tighten until later. Rail Strap Rail Strap Bolt Header Bracket Figure 20 Attach Rail Strap to Header Bracket For Help, call 1-800-35-GENIE or visit www.geniecompany.com 13
-
 1
1 -
2
-
3
-
4
-
5
-
6
-
7
-
 8
8 -
 9
9 -
 10
10 -
 11
11 -
 12
12 -
 13
13 -
 14
14 -
 15
15 -
 16
16 -
 17
17 -
 18
18 -
19
-
20
-
21
-
22
-
23
-
24
-
25
-
26
-
27
-
28
-
29
-
30
 |
 |
