Genie PowerLift Excelerator Owner's Manual - Page 6
Check Step 7, Check Step 8, Check Step 9 - power excelerator
 |
View all Genie PowerLift Excelerator manuals
Add to My Manuals
Save this manual to your list of manuals |
Page 6 highlights
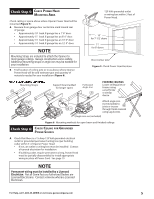
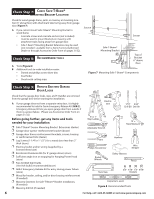
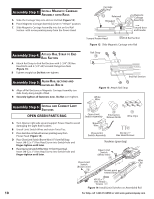
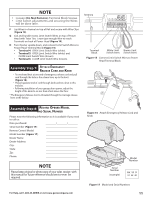
Ch e c k S tepM7:ounCthinegckBSraafcek-eTt-LBoeacamt®io n Check for wood garage frame, jamb, or masonry at mounting location (6" above floor) with attachment tabs facing away from garage door (Figure 7). A If you cannot mount Safe-T-Beam® Mounting Bracket to wood frame: • Concrete screws and concrete anchors (not included) must be used to mount Brackets on masonry with attachment tabs facing away from garage door. • Safe-T-Beam® Mounting Bracket Extensions may be used (not included - available from a Genie Factory Authorized Dealer or through Accessories Order Form on pages 31/32). Ch e c k Step 8: Recommended tools A Tools (Figure 8): B Additional tools to make installation easier: • Slotted and phillips screw-driver bits • Stud finder • Sheet-metal cutting snips Source Sensor Safe-T-Beam® Mounting Bracket Top of Bracket 6" above floor Figure 7 Mounting Safe-T-Beam® Components Ch e ck SteDp 9: Remove Existing Garage Door Locks Check that the garage door locks, rope, and T-Handles are removed from the garage door before starting the installation. A If your garage does not have a separate entry door, it is highly recommended to install a Genie Emergency Release Kit (GER-2). Emergency Release Kit lets you open garage door from outside if there is a power failure. (Please see Accessories Order Form on pages 31/32.) Before going further, get any items and tools needed for your installation p Safe-T-Beam® Sensor Mounting Bracket Extensions (dealer) p Garage door opener reinforcement bracket (dealer) p Garage door frame reinforcement brackets, screws, bracing or reinforcement kits (dealer) p Lag Screws (1-1/4"or 1-1/2" ) for a wood door less than 2" thick (store) p Electrical outlet and/or wiring (supplied by a licensed electrician) p Excelerator Extension Kit (for 8' garage doors) (store) p Sufficient angle iron or strapping for hanging Power Head (store) p Two 60 Watt light bulbs (130 Volt bulbs recommended)(store) p GER-2 Emergency Release Kit for entry during power failure (store) p Wood for header, ceiling, and/or door bracing reinforcement (if needed) p Masonry fasteners for Safe-T-Beam® Bracket installation, (if needed) p Masonry drill bit (if needed) Figure 8 Recommended Tools 6 For Help, call 1-800-35-GENIE or visit www.geniecompany.com
-
 1
1 -
 2
2 -
 3
3 -
 4
4 -
 5
5 -
 6
6 -
 7
7 -
 8
8 -
 9
9 -
 10
10 -
 11
11 -
 12
12 -
13
-
14
-
15
-
16
-
17
-
18
-
19
-
20
-
21
-
22
-
23
-
24
-
25
-
26
-
27
-
28
-
29
-
30
 |
 |
