Gigabyte G1.Assassin Manual - Page 114
Enabling Dolby Digital Live/DTS Connect Encoding
 |
UPC - 818313012203
View all Gigabyte G1.Assassin manuals
Add to My Manuals
Save this manual to your list of manuals |
Page 114 highlights
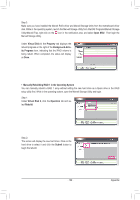
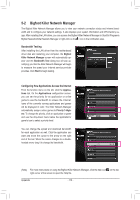
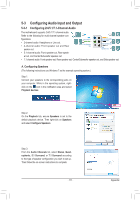
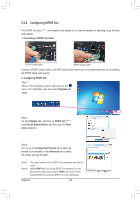
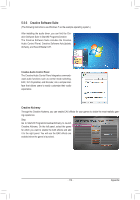
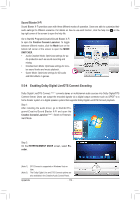
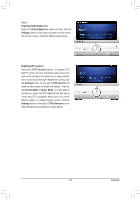
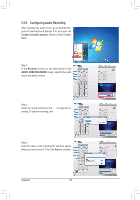
Sound Blaster X-Fi Sound Blaster X-Fi provides users with three different modes of operation. Users are able to customize their audio settings for different scenarios. For details on how to use each function, click the help icon on the top right corner of the screen to open the help file. Go to Start\All Programs\Creative\Sound Blaster X-Fi to open the Creative Console Launcher. To toggle between different modes, click the Mode icon on the bottom left corner of the screen to open the MODE SWITCHER. • Audio Creation Mode: Optimizes settings for au- dio production such as sound recording and mixing. • Entertainment Mode: Optimizes settings for movies sound tracks and music playback. • Game Mode: Optimizes settings for 3D audio and EAX effects in games. 5-3-4 Enabling Dolby Digital Live/DTS Connect Encoding Dolby Digital Live/DTS Connect (Note 1) converts stereo or multichannel audio sources into Dolby Digital/DTS Connect format. Users can output the encoded signals via a digital output connector such as S/PDIF to a home theater system or a digital speaker system that supports Dolby Digital Live/DTS Connect playback. Step 1: After installing the audio driver, go to Start\All Programs\Creative\Sound Blaster X-Fi and open the Creative Console Launcher (Note 2). Switch to Entertainment Mode. Step 2: On the ENTERTAINMENT MODE screen, select Encoder. (Note 1) (Note 2) DTS Connect is supported on Windows Vista or later. The Dolby Digital Live and DTS Connect options are also available in the Creative Audio Control Panel. Appendix - 114 -
-
 1
1 -
2
-
3
-
4
-
5
-
6
-
7
-
8
-
9
-
10
-
11
-
12
-
13
-
14
-
15
-
16
-
17
-
18
-
19
-
20
-
21
-
22
-
23
-
24
-
25
-
26
-
27
-
28
-
29
-
30
-
31
-
32
-
33
-
34
-
35
-
36
-
37
-
38
-
39
-
40
-
41
-
42
-
43
-
44
-
45
-
46
-
47
-
48
-
49
-
50
-
51
-
52
-
53
-
54
-
55
-
56
-
57
-
58
-
59
-
60
-
61
-
62
-
63
-
64
-
65
-
66
-
67
-
68
-
69
-
70
-
71
-
72
-
73
-
74
-
75
-
76
-
77
-
78
-
79
-
80
-
81
-
82
-
83
-
84
-
85
-
86
-
87
-
88
-
89
-
90
-
91
-
92
-
93
-
94
-
95
-
96
-
97
-
98
-
99
-
100
-
101
-
102
-
103
-
104
-
105
-
106
-
107
-
108
-
 109
109 -
 110
110 -
 111
111 -
 112
112 -
 113
113 -
 114
114 -
 115
115 -
 116
116 -
 117
117 -
 118
118 -
 119
119 -
120
-
121
-
122
-
123
-
124
-
125
-
126
-
127
-
128
 |
 |
