Gigabyte GA-8AENXP Dual Graphic Manual - Page 82
View Drive Assignments
 |
View all Gigabyte GA-8AENXP Dual Graphic manuals
Add to My Manuals
Save this manual to your list of manuals |
Page 82 highlights
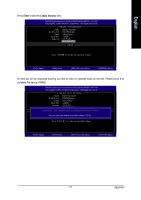
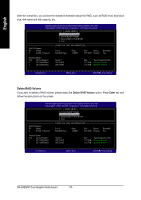
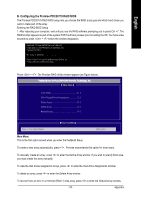
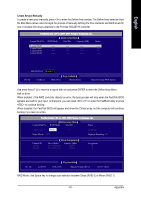
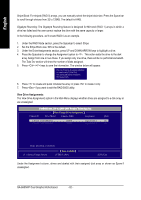
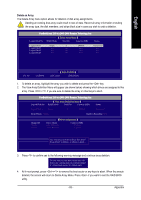
English Stripe Block: For striped (RAID 0) arrays, you can manually select the stripe block size. Press the Space bar to scroll through choices from 32 to 128KB. The default is 64KB. Gigabyte Rounding: The Gigabyte Rounding feature is designed for Mirrored (RAID 1) arrays in which a drive has failed and the user cannot replace the drive with the same capacity or larger. In the following procedure, we'll create RAID 0 as an example. 1. Under the RAID Mode section, press the Spacebar to select Stripe. 2. Set the Stripe Block size. 64K is the default. 3. Under the Drive Assignments section, press UP and DOWN ARROW keys to highlight a drive. 4. Press the Spacebar to change the Assignment option to . This action adds the drive to the disk array. Assign from one or two drives. If you assign only one drive, there will be no performance benefit. The Total Drv section will show the number of disks assigned. 5. Press + keys to save the information. The window below will appear. Do you want to do quick initialize or create only? (Yes/No) Y-Create and Quick Initialize N-Create Only 6. Press to create and quick initialize the array or press to create it only. 7. Press if you want to exit the RAID BIOS utility. View Drive Assignments The View Drive Assignments option in the Main Menu displays whether drives are assigned to a disk array or are unassigned. FastBuild (tm) 2.03 (c) 2003-2005 Promise Technology, Inc. [ View/Change Drives Assignments ] Channel:ID Drive Model Capacity (MB) Assignment 1:SATA ST3120026AS 2:SATA ST3120026AS 120034 120034 Logical Disk 1 Logical Disk 1 Mode U6 U6 Mode (D=DMA, U=UDMA) [ , ,Space] Change Option [ Keys Available ] ] [CTRL-Y] Save [ESC] Exit Under the Assignment column, drives are labeled with their assigned disk array or shown as Spare if unassigned. GA-8AENXP Dual Graphic Motherboard - 82 -
-
 1
1 -
2
-
3
-
4
-
5
-
6
-
7
-
8
-
9
-
10
-
11
-
12
-
13
-
14
-
15
-
16
-
17
-
18
-
19
-
20
-
21
-
22
-
23
-
24
-
25
-
26
-
27
-
28
-
29
-
30
-
31
-
32
-
33
-
34
-
35
-
36
-
37
-
38
-
39
-
40
-
41
-
42
-
43
-
44
-
45
-
46
-
47
-
48
-
49
-
50
-
51
-
52
-
53
-
54
-
55
-
56
-
57
-
58
-
59
-
60
-
61
-
62
-
63
-
64
-
65
-
66
-
67
-
68
-
69
-
70
-
71
-
72
-
73
-
74
-
75
-
76
-
 77
77 -
 78
78 -
 79
79 -
 80
80 -
 81
81 -
 82
82 -
 83
83 -
 84
84 -
 85
85 -
 86
86 -
 87
87 -
88
-
89
-
90
-
91
-
92
-
93
-
94
-
95
-
96
 |
 |