Gigabyte GV-R7500L Manual
Gigabyte GV-R7500L Manual
 |
View all Gigabyte GV-R7500L manuals
Add to My Manuals
Save this manual to your list of manuals |
Gigabyte GV-R7500L manual content summary:
- Gigabyte GV-R7500L | Manual - Page 1
Upgrade your Life GV-R7500L RADEONTM 7500 Graphics Accelerator USER'S MANUAL REV. 103 12MD-R7500L-103 - Gigabyte GV-R7500L | Manual - Page 2
Copyright by GIGA-BYTE TECHNOLOGY CO., LTD. ("GBT") No part of this manual may be reproduced or transmitted in any from without the expressed, written permission of Corporation. Reverse engineering or disassembly is prohibited. March 17, 2003 Taipei, Taiwan GV-R7500L GraphicsAccelerator - 2 - - Gigabyte GV-R7500L | Manual - Page 3
15 3.1.5 Taskbar Icon 16 3.1.6 Property pages 23 3.2.WINDOWS NT 4.0 DRIVER INSTALLATION 31 3.3.WINDOWS 2000 DRIVER INSTALLATION 32 3.4 BIOS FLASH UTILITY 32 4.Troubleshooting Tips 33 5.Appendix 5.1.How to refash the BIOS 34 5.2.Resolutions and Color Depth Table 36 - 3 - Table of Content - Gigabyte GV-R7500L | Manual - Page 4
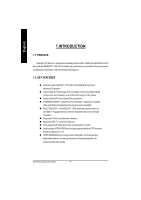
Manual 1.INTRODUCTION 1.1. PREFACE Gigabyte n Support ofDirectX 8 ® and OpenGL® applications n CHARISMA ENGINE™ supports full bit at high resolutions n Supported V-Tuner for performance tweaker. n Supported CRT, TV-out and Leading-edge HYDRA VISION technology supports traditional CRT monitors, flat - Gigabyte GV-R7500L | Manual - Page 5
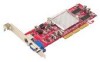
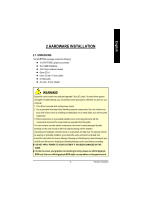
2.HARDWARE INSTALLATION 2.1. UNPACKING The GV-R7500L package contains the following: l The GV-R7500L graphics accelerator l This USER'S MANUAL l DVD Player software included use official Gigabyte BIOSonly Use none official gigabyte BIOS might cause problem on the graphics card. - 5 - Hardware - Gigabyte GV-R7500L | Manual - Page 6
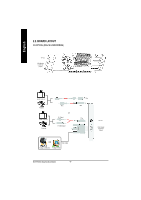
English 2.2. BOARD LAYOUT GV-R7500L (8Mx16 64MB DDRAM) TV-Out VGA Monitor C onnector (15pin) NTSC / PAL TV Pr oj ec tor NTSC / PAL TV Pr utput 7P in 4P in 7P in TV -out VGA Monitor C onnector (15pin) OR VGA Output A nalog LC D M onitor A nalog M onitor GV-R7500L GraphicsAccelerator - 6 - - Gigabyte GV-R7500L | Manual - Page 7
monitor, then disco nnect the display cable from the ba ck of your computer. 2. Remove the computer cover. If necessary, consult your computer's manual for help in removing the cover. 3. Remove anyexisting graphics card from your computer. Or, if your computer has any on-board graphics capability - Gigabyte GV-R7500L | Manual - Page 8
press it in firmly until the card is fully eated. GV-R7500L Graphics card AGP Slot 5. Replace the screw to fasten the card in place, and replace of the Graphics card driver. For detailed instructions, se lect your operating system from the list below: GV-R7500L GraphicsAccelerator - 8 - - Gigabyte GV-R7500L | Manual - Page 9
English 3.SOFTWARE INSTALLATION In this manual, we assume that your CD-ROM Drive letter to be Drive D: AUTORUN window (if it does notshow up, run "D:\setup.exe"). Then you can follow guides to setup your GV-R7500L driver (Please follow the subsection 3.1.3 "Step By Step Installation" to install the - Gigabyte GV-R7500L | Manual - Page 10
better 3D performence. Note: For software MPEG support in Win98/98SE or WinME, you must DirectX first install. MMust be in stall DirectX 8.1 (or later) 1. Installation DirectX Driver Click "Install DirectX 8.1"Item. 2.Click "Yes" icon. 3.Click "Yes"icon. GV-R7500L GraphicsAccelerator - 10 - - Gigabyte GV-R7500L | Manual - Page 11
English 4.Click "OK" item. Then the DirectX 8.1 installation is completed. - 11 - Software Installation - Gigabyte GV-R7500L | Manual - Page 12
English 3.1.3.Driver Installation The following is the step-by-step installation guide. Step 1: New Hardware Found After GV-R7500L is inserted into your co mputer at the first time, the windows will automatically detecta new hardware in the system and pop outa "New - Gigabyte GV-R7500L | Manual - Page 13
English 3.Click "NO"icon. After the system has finished loading, insert the GV-R7500L driver CD disk into your CD-ROM, and then you can see the AUTORUN window. Ifitdoes not show up, please run "D:\setup.exe". Step 5: - Gigabyte GV-R7500L | Manual - Page 14
English 3.Click "Yes". 4. Click "Finish" to restart computer. GV-R7500L GraphicsAccelerator - 14 - - Gigabyte GV-R7500L | Manual - Page 15
English 3.1.4.Utilities on driver CD The utilities include Display Driver and V-Tuner utilities. Please browse the driver CD for detail. Other Utility (V-Tuner and Hydravision) Follow the setup that showing on the screen to install the Utility. A.Installing V-Tuner Utility Click "V-Tuner"Item. B. - Gigabyte GV-R7500L | Manual - Page 16
your display settings. Right click the icon. You can link to GBT website for updated information about the graphics card, latest drivers, and other information. GV-R7500L GraphicsAccelerator - 16 - - Gigabyte GV-R7500L | Manual - Page 17
memory(Core Clock and Memory Clock) Display & Adjust Min V-Tuner Core Clock Display Core Clock Close V-Tuner Display Memory Clock Link to the Websit of Gigabyte Help description Display & Adjust Memory Clock Close V-Tuner To system Tray - 17 - Software Installation - Gigabyte GV-R7500L | Manual - Page 18
English VGA Info VGA Info lists the relevant info rmation about your card. Color Adjust Color Adjust allows you to make color adjustments, such as brightness, contrast, and gamma values for each or all of RGB colors. GV-R7500L GraphicsAccelerator - 18 - - Gigabyte GV-R7500L | Manual - Page 19
English After in stalla tion of th e disp lay d rivers, you will find an ATI ico n Clicking this icon open the ATi control panel. on the taskbar's status area. 1.Rotate Screen 2.Using Single Display HYDRAVISION™ HYDRAVISION™ and the Desktop Manager are activated whenever Windows® starts. - Gigabyte GV-R7500L | Manual - Page 20
apply those settings when the application is re-opened. Automatically align monitors - You can manually define monitor placement from the Settings dialog in the Display Properties dialog box. When this information and a link to the ATI Te chnologies website. GV-R7500L GraphicsAccelerator - 20 - - Gigabyte GV-R7500L | Manual - Page 21
English Load/Unload Desktop Manager - This button restores or removes the HydraVision Desktop Manager tracking program. Unloading the Desktop Manager returns display settings to Windows defaults. You should only select this option if you do not want to use any multiple monitor dialog box controls - Gigabyte GV-R7500L | Manual - Page 22
Awindow can be given added depth by enabling Shadow support. Transparency Control: 3D Controls: Transparency Control Enable or 'fade-in' to your desktop. 3D Controls Enable Shadow support - Check this box to enable the Shadow support sliders. The Visib ility slider sets the degree of visibility of - Gigabyte GV-R7500L | Manual - Page 23
graphics warning messages. n Enable ATI taskbar icon application enables or disables the ATI taskbar icon. However, this feature must be enabled forATI hotkey support. n Show ATI icon on taskbar adds or removes the ATI icon from the taskbar. n Disable quick resolution feature is accessible by left - Gigabyte GV-R7500L | Manual - Page 24
should increase, requiring a higher quality texture of the same image. The base mipmap is the highest quality texture, and all subsequent mipmaps are smaller sized GV-R7500L GraphicsAccelerator - 24 - - Gigabyte GV-R7500L | Manual - Page 25
l Force Z-buffer depth allows you to explicitly setthe Z-Buffer depth. Most applications will work best when Disabled is selected. l Alpha dithering method l Support KTX buffer region extension Enabling this fea- ture allows rap id update s of those portions of your screen that have cha nged. No te - Gigabyte GV-R7500L | Manual - Page 26
textures of the same image. As the user moves closer to a 3D object the image quality should increase, requiring a higher quality texture ofthe same image. GV-R7500L GraphicsAccelerator - 26 - - Gigabyte GV-R7500L | Manual - Page 27
limited number of texture formats. By selecting Disabled, the driver will not support DTX texture formats, thus reducing the number of texture formats supported. l Alternate pixel center This may eliminate problems with some Direct3D games which display vertical and horizontal lines around textures - Gigabyte GV-R7500L | Manual - Page 28
controls allow you to increase or decrease the color brightness of Direct 3D and OpenGL games played in fullscreen mode. (NOTE: Game Gamma is NOT supported in Windows NT4.0) n RGB Lock adjust the RGB sliders individually or adjust all three sliders at the same time. n Default resets the Game Gamma - Gigabyte GV-R7500L | Manual - Page 29
graphics card is installed correctly. Forinformation about placing the card in your computerand installing the enhanced graphics driver, see the user's manual. Determine ifyour television (or VCR) has an S-Video or Composite video connection. Looking atthe back of your computer, locate your graphics - Gigabyte GV-R7500L | Manual - Page 30
the screen. If your monitor is capable of operating in either Landscape or Portrait mode, you can adjust the screen by this properties. GV-R7500L GraphicsAccelerator n Rotation l Standard Landscape allows you to set the screen at standard landscape. l Rotate 90°Right allows you to rotate the - Gigabyte GV-R7500L | Manual - Page 31
have installed Windows NT 4.0 Service Pack version 6.0 (or later) before installing the GV-R7500L graphics accelerator driver. To install the GV-R7500L driver for Windows NT license agreement. 9. Follow the Wizard's on-screen instructions to complete the installation. - 31 - Software Installation - Gigabyte GV-R7500L | Manual - Page 32
8. Click "Yes"to the license agreement. 9. Follow the Wizard's on-screen instructions to complete the installation. 3.4.BIOS FLASH UTILITY GV-R7500L BIOS update procedure: M Note: Please download the newest BIOS from our website (www.gigabyte.com.tw) or contact. your local dealer for the file. M If - Gigabyte GV-R7500L | Manual - Page 33
. For more information, consult your computer's manual or manufacturer. (NOTE: Some manufacturers do not troubleshooting tips, right-click the ATI icon in the taskbar and select Troubleshooting. n If you have problems Troubleshooting Guide located in the Windows® Help or contact your computer - Gigabyte GV-R7500L | Manual - Page 34
English 5.Appendix 5.1. How to reflash the BIOS MWe use GV-AR64SH VGA card and Atiflash BIOS flash utility as example. How to reflash the BIOS for your graphics card your OS is Windows 2000 / Windows Me / Windows XP, please use the bootable disk to MS-DOS mode) GV-R7500L GraphicsAccelerator - 34 - - Gigabyte GV-R7500L | Manual - Page 35
English 3. Change the command path to the file location C:\> or A:\> 4. Reflash BIOS command as below : C:\> atiflash -p 0 5. Reboot your PC when it's done. - 35 - Appendix - Gigabyte GV-R7500L | Manual - Page 36
P P P P P P P P P P P P P P P 16bpp(65K color) 32bpp(16.7M) High m ode True mode P P P P P P P P P P P P P P P P P P P P P P P P P P P P P P P P P P P P P P P P P P P P P P P P P P P P . To be continued.. GV-R7500L GraphicsAccelerator - 36 - - Gigabyte GV-R7500L | Manual - Page 37
English DDisplay Refresh Screen Rate Resolution (Hz) 120 140 150 1024x768 160 200 43 47 60 70 75 1152x864 80 85 100 120 150 160 60 70 72 1280x960 75 85 100 120 160 43 47 60 70 72 74 1280x1024 75 85 90 100 Hor. Scan (KHz) 98.7 116.6 125.7 134.8 172.8 38.0 41.7 53.7 63.0 67.5 72.4 77.0 91.5 111.1 - Gigabyte GV-R7500L | Manual - Page 38
(65K color) 32bpp(16.7M) High m ode True mode P P P P P P P P P P P P P P P P P P P P P P P P P P P P P P P P P P P P P P P P P P P P P P P P P P P P P P P P P P P P P P P P To be continued.. GV-R7500L GraphicsAccelerator - 38 - - Gigabyte GV-R7500L | Manual - Page 39
English DDisplay Refresh Screen Rate Resolution (Hz) 1600x1280 86.52 60 1792x1344 75 85 60 1800x1440 70 90 1856x1392 60 72 75 90 60 1920x1080 70 75 85 1920x1200 60 72 75 76 80 85 1920x1440 60 60 75 2048x1152 85 100 60 70 2048x1280 75 85 90 60 66 2048x1280 70 75 * GBT no guarantee Hor. Scan (KHz) - Gigabyte GV-R7500L | Manual - Page 40
English GV-R7500L GraphicsAccelerator - 40 -
-
 1
1 -
 2
2 -
 3
3 -
 4
4 -
 5
5 -
 6
6 -
 7
7 -
8
-
9
-
10
-
11
-
12
-
13
-
14
-
15
-
16
-
17
-
18
-
19
-
20
-
21
-
22
-
23
-
24
-
25
-
26
-
27
-
28
-
29
-
30
-
31
-
32
-
33
-
34
-
35
-
36
-
37
-
38
-
39
-
40
 |
 |

GV-R7500L
RADEON
TM
7500 Graphics Accelerator
REV. 103
12MD-R7500L-103
USER'S MANUAL
Upgrade your Life