Hayward PL-PLUS Operation Manual - Page 14
Toggle between Always On and On for 60 sec., Move to previous/next menu item - aqua
 |
View all Hayward PL-PLUS manuals
Add to My Manuals
Save this manual to your list of manuals |
Page 14 highlights
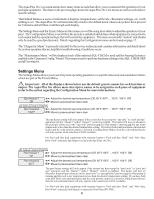
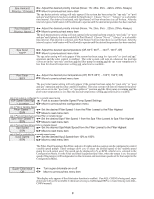
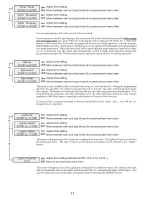
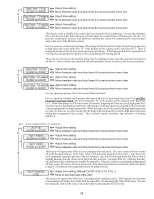
Set Day and Time Wednesday 1100::3377PP Adjust the current day of the week Move to hours setting Set Day and Time Wednesday 37 Adjust the current hour (including AM/PM if applicable) Move to minutes setting Set Day and Time Wednesday 10: P Adjust the current minute Move to previous/next menu item Use this function to set the current day of the week and time. These values are used for all the automatic timeclock functions of the Aqua Plus 16v and are also displayed as part of the default menu. The Aqua Plus 16v is designed to keep the clock running during power outages lasting less than 7 days. If power has been off for longer than 7 days, then the time may have to be reset. Display Light On for 60 sec Toggle between Always On and On for 60 sec. Move to previous/next menu item This function controls the backlight on the display. If the "On for 60 seconds" option is selected, then the backlight will automatically turn off 60 seconds after the last key is pressed and will stay off until next time a key is pressed. Note that the Display Light selection only applies to the display keypad that you are currently using. Other display/keypads will not be affected. You need to individually set this option for each display/ keypad in the system. Beeper Enabled Toggle between Enabled (default) and Disabled Beeper Move to next menu item When "Enabled", the keypad will beep every time a key is pressed. If this audible indication is not desired, select "Disabled". This function only applies to the display/keypad that you are currently using. You need to set this option for each display/keypad in your system. NOTE: This function is not supported on all display/keypads. If the "Enabled" selection is not blinking, then the current software revision of that particular keypad/display does not support the option and it will default to Beeper Enabled. Teach Wireless + to start Press and hold wireless button Teach Wireless Successful Teach Wireless NOT Successful Teach Wireless Base NOT Found Push to start process Move to previous/next menu item Press any button on wireless remote Move to previous/next menu item Move to previous/next menu item Move to previous/next menu item Move to previous/next menu item This menu will only appear if a wireless base station is connected to the Aqua Plus 16v. Perform this procedure each time a wireless remote control is added to the Aqua Plus 16v system. During this procedure the wireless remote "learns" and remembers the ID code for the wireless base station connected to this particular Aqua Plus 16v unit and will reject messages with any other ID codes. If "Base NOT found" is displayed, then the Aqua Plus 16v can not communicate with the transmitter/ receiver base station attached to the main unit. If "NOT Successful" is displayed, then the base station did not receive a signal from the remote control. This may be due to the distance between the Base Receiver and the remote device being too great or may be due to interference caused by other RF equipment operating in the neighborhood. Try using the "Change Channel" command and then repeat the "Teach Wireless" command. 11
-
 1
1 -
2
-
3
-
4
-
5
-
6
-
7
-
8
-
 9
9 -
 10
10 -
 11
11 -
 12
12 -
 13
13 -
 14
14 -
 15
15 -
 16
16 -
 17
17 -
 18
18 -
 19
19 -
20
-
21
-
22
-
23
-
24
-
25
-
26
-
27
-
28
-
29
-
30
-
31
-
32
-
33
-
34
-
35
-
36
-
37
-
38
-
39
-
40
-
41
-
42
-
43
-
44
-
45
-
46
-
47
-
48
-
49
-
50
-
51
-
52
 |
 |
