Hayward Pro Logic Model: PL-PS-4 PL-PS-8 PL-PS-16 PL-PS-16V Operation - Page 11
System Maintenance - configuration menu locked
 |
View all Hayward Pro Logic manuals
Add to My Manuals
Save this manual to your list of manuals |
Page 11 highlights
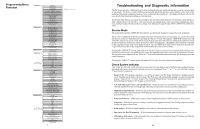
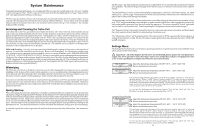
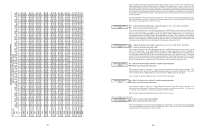
System Maintenance To maintain maximum performance, it is recommended that you open and visually inspect the cell every 3 months or after cleaning your filter. The Pro Logic will remind you to do this by displaying the message "Inspect/Clean Cell" after approximately 500 hours of operation. The Pro Logic electrolytic cell has a self cleaning feature incorporated into the electronic control's logic. In most cases this self cleaning action will keep the cell working at optimum efficiency. In areas where water is hard (high mineral content) or in pools where the water chemistry has been allowed to get "out of balance", the cell may require periodic cleaning. Servicing and Cleaning the Turbo Cell Turn off power to the Pro Logic before removing the electrolytic cell. Once removed, look inside the cell and inspect for scale formation (light colored crusty or flaky deposits) on the plates and for any debris which has passed through the filter and caught on the plates. If no deposits are visible, reinstall. If deposits are seen, use a high pressure garden hose and try to flush the scale off. If this is not successful, use a plastic or wood tool (do not use metal as this will scratch the coating off the plates) and scrape deposits off of plates. Note that a buildup on the cell indicates that there is an unusually high calcium level in the pool (old pool water is usually the cause). If this is not corrected, you may to have to periodically clean the cell. The simplest way to avoid this is to bring the pool chemistry to the recommended levels as specified. Mild Acid Washing: Use only in severe cases where flushing and scraping will not remove the majority of deposits. To acid wash, turn off power to Pro Logic. Remove cell from piping. In a clean plastic container, mix a 2:1 solution of water to muriatic acid (one gallon of water to two quarts of muriatic acid). ALWAYS ADD ACID TO WATER - NEVER ADD WATER TO ACID. Be sure to wear rubber gloves and appropriate eye protection. The level of the solution in the container should just reach the top of the cell so that the wire harness compartment is NOT submerged. It may be helpful to coil the wiring before immersing the cell. The cell should soak for a few minutes and then rinse with a high pressure garden hose. If any deposits are still visible, repeat soaking and rinsing. Replace cell and inspect again periodically. Winterizing The Pro Logic electrolytic cell and flow detection switch will be damaged by freezing water just as your pool plumbing would. In areas of the country which experience severe or extended periods of freezing temperatures, be sure to drain all water from the pump, filter, and supply and return lines before any freezing conditions occur. The electronic control is capable of withstanding any winter weather and should not be removed. If you are in an area that only experiences occasional freezing conditions, your Pro Logic system may be set up to circulate the pool water whenever the air sensor drops to the selected freeze temperature threshold. Make sure the air sensor is recording the correct temperature and is NOT located in the direct sunlight to ensure proper freeze protection operation. Spring Start-up When first starting the pool in the spring time, it is highly recommended that you temporarily set the pool and spa chlorinator settings (Settings Menu/Pool Sanitizer & Spa Sanitizer) to 0% (off) and then manually shock the pool with any chlorine based shock product and balance the pool water chemistry per the levels indicated in the Chlorinator Operation section. Make sure to check the salt and stabilizer levels and bring them up to the recommended levels. Your local Authorized Hayward Dealer or pool store can recommend the best chemical treatment for your pool. After the water is clear and balanced, then go back and adjust the pool and spa chlorinator settings to the appropriate levels. Test the pool chlorine level weekly and adjust the chlorinator settings up or down accordingly. It is usually a good idea to also inspect the cell and clean if necessary at the start of the season. See instructions above. 39 The Pro Logic's six main menus have many items in each that allow you to customize the operation of your pool/ spa equipment. The chart on the previous page shows the Pro Logic's six menus as well as each menu's specific settings. The Default Menu is a series of informative displays (temperatures, salt levels, chlorinator settings, etc.) with nothing to set. The Pro Logic will automatically switch to the default menu when no keys have been pressed for 2 minutes and will then scroll through each display. The Settings Menu and the Timers Menu are the menus you will be using most often to adjust the operation of your pool. The Configuration Menu is used when the system is installed and defines what equipment is connected to each output and the operational logic that will control the equipment. This menu is normally "locked" and should only be used by a pool professional. Details regarding the Configuration menu can be found on page 17. The "Diagnostic Menu" is primarily intended for the service technician and contains information and details about the system operation that are helpful in troubleshooting, if problems occur. The "Maintenance Menu" will be displayed only if the optional AQL-CHEM is used and the Sensing System is enabled in the Chemistry Config. Wizard. This menu is used to perform functions relating to the AQL-CHEM ORP and pH sensing kit. Settings Menu The Settings Menu allows you to set all system operating parameters except the timeclock and countdown timers which are part of the Timers Menu. ! Important: All of the displays shown below use the default generic names for each function or output. The Pro Logic allows more descriptive names to be assigned to each piece of equipment (refer to the section regarding the Configuration Menu for more information). Spa Heater1 Off not shown if Pool and Spa-Dual with separate heaters is selected Spa Heater2 102°F Adjust the desired spa temperature (Off, 65°F, 66°F, ...103°F, 104°F, Off) Move to previous/next menu item Adjust the desired spa temperature (Off, 65°F, 66°F, ...103°F, 104°F, Off) Move to previous/next menu item The spa heater setting will only appear if the system has been setup for "spa only" or "pool and spa" operation and the "Heater1" and/or "Heater2" control is enabled. The heater will turn on whenever the pool/spa valves are in the "spa only" position and the filter pump is running and the spa water temperature is less than the desired temperature setting. If you have both solar heat and a conventional heater and the solar priority option is selected (Configuration Menu), then the conventional heater will only operate when solar heat is NOT available. For Pool and Spa dual equipment with separate heaters ("Pool and Spa -Dual" and "Htr1=Spa, Htr2=Pool" selected), Spa Heater1 is tied to the Spa Filter (AUX1). not shown if Pool and Spa-Dual with separate heaters is selected Pool Heater1 Off Adjust the desired pool temperature (Off, 65°F, 66°F, ...103°F, 104°F, Off) Move to previous/next menu item Pool Heater2 85°F Adjust the desired pool temperature (Off, 65°F, 66°F, ...103°F, 104°F, Off) Move to previous/next menu item The pool heater setting will only appear if the system has been setup for "pool only" or "pool and spa" operation and the "Heater1" and/or "Heater2" control is enabled. The heater will turn on whenever the pool/spa valves are in the "pool only" or "spa spillover" position and the filter pump is running and the pool water temperature is less than the desired temperature setting. If you have both solar heat and a conventional heater and the solar priority option is selected (Configuration Menu), then the conventional heater will only operate when solar heat is NOT available. For Pool and Spa dual equipment with separate heaters ("Pool and Spa -Dual" and "Htr1=Spa, Htr2=Pool" selected), Pool Heater2 is tied to the Pool Filter (FILTER). 8
-
 1
1 -
2
-
3
-
4
-
5
-
 6
6 -
 7
7 -
 8
8 -
 9
9 -
 10
10 -
 11
11 -
 12
12 -
 13
13 -
 14
14 -
 15
15 -
 16
16 -
17
-
18
-
19
-
20
-
21
-
22
-
23
-
24
-
25
-
26
 |
 |