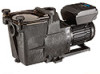
Hayward Super Pump® VS Super Pump® VS Manual - Page 10
Electrical Specs, Voltage, Grounding and Bonding, Wiring, WARNING, Installation Procedure
 |
View all Hayward Super Pump® VS manuals
Add to My Manuals
Save this manual to your list of manuals |
Page 10 highlights
4.6. Electrical Specs 1. Voltage: 230VAC, 60Hz, Single Phase 2. Amps: 5.9 3. Speed Range: 600-3000 rpm Use copper conductors only. For indoor & outdoor use. Connect pump to a 15 amp branch circuit in accordance with local codes, regulations, and the National Electric Code (NEC). A disconnecting means located at least 5 ft. from the inside wall of the pool, spa, or hot tub must be provided. 4.7. Voltage Voltage at pump MUST NOT be more than 10% above or below nameplate rated voltage, or components may overheat, causing overload tripping and reduced component life. If voltage is less than 90% (207 V) or more than 110% (253 V) of rated voltage (230 V) when pump is running at full load, consult the power company. 4.8. Grounding and Bonding 1. Install, ground, bond, and wire pump in accordance with local or national electrical code requirements. 2. Permanently ground pump. Use green ground terminal provided under access plate; use size and type wire required by code. Connect ground terminal to electrical service ground. 3. Bond pump to pool structure. Bonding will connect all metal parts within and around the pool with a continuous wire. Bonding reduces the risk of a current passing between bonded metal objects, which could potentially cause electrical shock if grounded or shorted. Reference NEC codes for all wiring standards including, but not limited to, grounding, bonding and general wiring procedures. 4. Use a solid copper conductor, size 8 or larger. Run wire from external bonding lug to reinforcing rod or mesh. Connect a No. 8 AWG (8.4 mm2) [No. 6 AWG (13.3 mm2) for Canada] solid copper bonding wire to the pressure wire connector provided on the motor housing and to all metal parts of swimming pool, spa, or hot tub, and to all electrical equipment, metal piping (except gas piping), and conduit within 5 ft. (1.5 m) of inside walls of swimming pool, spa, or hot tub. 4.9. Wiring WARNING - All electrical wiring MUST conform to local codes, regulations, and the National Electric Code (NEC). 1. Pump MUST be permanently connected to circuit. If other lights or appliances are also on the same circuit, be sure to add their amp loads before calculating wire and circuit breaker sizes. Use the circuit breaker as the master On-Off switch. 4.10. Installation Procedure Please review sections 4.1 through 4.9 before continuing with this section. 1. TURN OFF THE ELECTRICAL POWER AT THE CIRCUIT BREAKER. 2. Remove the wiring access cover on the motor drive. This is done by removing the four (4) screws on the top of the cover using a 3mm hex wrench. Note, be careful not to pull on the wires going to the controller when removing. 3. Connect 230VAC line power supply wiring to the terminal block and ground screw as shown in the Input Power Wiring diagram. See section 5.1 for diagram. Page 10 of 24 USE ONLY HAYWARD GENUINE REPLACEMENT PARTS Super Pump Variable Speed Pump IS2600VSP Rev C
-
 1
1 -
2
-
3
-
4
-
 5
5 -
 6
6 -
 7
7 -
 8
8 -
 9
9 -
 10
10 -
 11
11 -
 12
12 -
 13
13 -
 14
14 -
 15
15 -
16
-
17
-
18
-
19
-
20
-
21
-
22
-
23
-
24
 |
 |