Hayward Super Pump® VS Super Pump® VS Manual - Page 19
Replacement Parts
 |
View all Hayward Super Pump® VS manuals
Add to My Manuals
Save this manual to your list of manuals |
Page 19 highlights
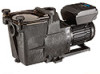
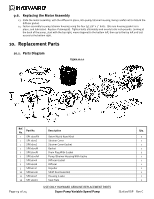
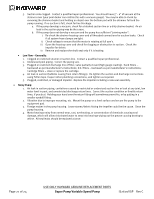
9.6. Replacing the Motor Assembly 13. Slide the motor assembly, with the diffuser in place, into pump/strainer housing, being careful not to disturb the diffuser gasket. 14. Fasten assembly to pump/strainer housing using the four (4) 3/8" x 2" bolts. (Be sure housing gasket is in place, and lubricated. Replace if damaged). Tighten bolts alternately and evenly to 80 inch-pounds. Looking at the back of the pump, start with the top right, move diagonal to the bottom left, then up to the top left and last across to the bottom right. 10. Replacement Parts 10.1. Parts Diagram Figure 10.1-1 Ref. Part No. No. 1 SPX1600PN 2 SPX1600D 3 SPX1600S 4 SPX1600M 5 SPX1700FG 6 SPX1600AA 7 SPX1600R 8 SPX1616B 9 SPX1621C 10 SPX1600Z2 11 SPX1600T 12 SPX1611E5 Description Swivel Nut & Hand Knob Strainer Cover Strainer Cover Gasket Basket Drain Plug With Gasket Pump/Strainer Housing With Gasket Diffuser Gasket Diffuser Impeller Shaft Seal Assembly Housing Gasket Seal Plate Page 19 of 24 USE ONLY HAYWARD GENUINE REPLACEMENT PARTS Super Pump Variable Speed Pump Qty. 2 1 1 1 2 1 1 1 1 1 1 1 IS2600VSP Rev C
-
 1
1 -
2
-
3
-
4
-
5
-
6
-
7
-
8
-
9
-
10
-
11
-
12
-
13
-
 14
14 -
 15
15 -
 16
16 -
 17
17 -
 18
18 -
 19
19 -
 20
20 -
 21
21 -
 22
22 -
 23
23 -
 24
24
 |
 |
