Hayward Super Pump® VS Super Pump® VS Manual - Page 11
Wiring Diagrams, Startup & Operation
 |
View all Hayward Super Pump® VS manuals
Add to My Manuals
Save this manual to your list of manuals |
Page 11 highlights
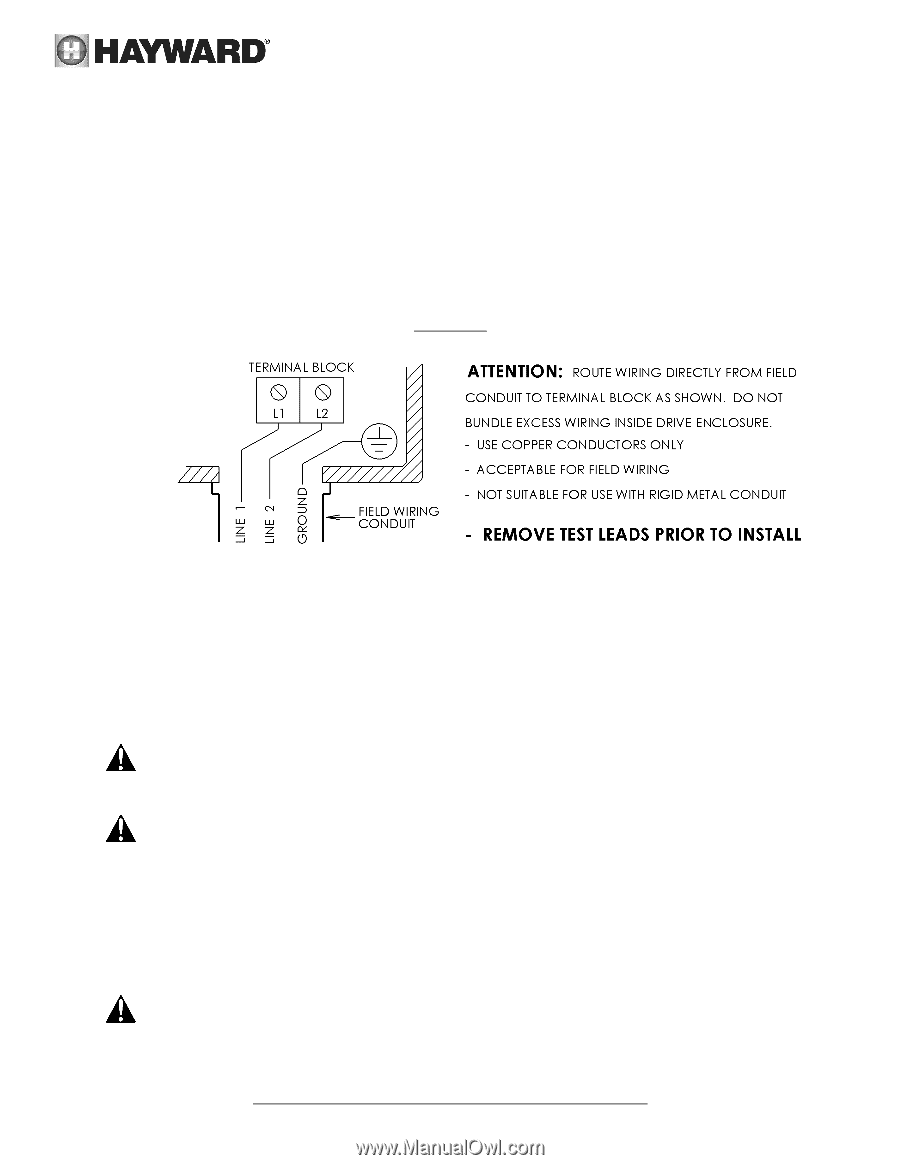
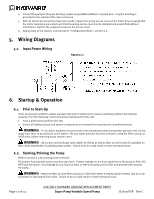
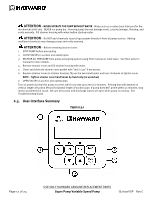
4. Connect the pump to the pool bonding system using 8AWG (6AWG for Canada) wire. A lug for bonding is provided on the outside of the drive enclosure. 5. After all electrical connections have been made, replace the wiring access cover on the motor drive ensuring that the motor lead wires are routed such that the wiring access cover can be installed and seated fully without interference. Tighten the supplied screws on the access cover. 6. Apply power to the system, and proceed to "Configuration Menu", section 6.6. 5. Wiring Diagrams 5.1. Input Power Wiring Figure 5.1-1 6. Startup & Operation 6.1. Prior to Start-Up If it is necessary to perform a water pressure test prior to initial use to ensure plumbing system is functioning properly, then the following criteria should be maintained for this test: 1. Have a professional perform this test. 2. Ensure all Hayward pump and system components are removed from system prior to performing test. WARNING - If circulation equipment must remain in the plumbing system during water pressure test, do not apply more than 10 psi pressure to the system. Be sure water pressure has been released, using the filter manual air relief valve, before removing pump strainer cover. WARNING - All suction and discharge valves MUST be OPEN, as well as filter air relief valve (if available) on filter, when starting the circulating pump system. Failure to do so could result in severe personal injury. 6.2. Starting/Priming the Pump Refer to section 6.6 for priming mode selection. Fill strainer housing with water to suction pipe level. If water leakage occurs from anywhere on the pump or filter, DO NOT start the pump. If no leakage occurs, stand at least 10 feet from pump and/or filter and proceed with starting the pump. WARNING - Return to filter to close filter manual air relief valve when a steady stream of water (not air or air and water) is discharged from valve. Failure to do so could result in severe personal injury. Page 11 of 24 USE ONLY HAYWARD GENUINE REPLACEMENT PARTS Super Pump Variable Speed Pump IS2600VSP Rev C
-
 1
1 -
2
-
3
-
4
-
5
-
 6
6 -
 7
7 -
 8
8 -
 9
9 -
 10
10 -
 11
11 -
 12
12 -
 13
13 -
 14
14 -
 15
15 -
 16
16 -
17
-
18
-
19
-
20
-
21
-
22
-
23
-
24
 |
 |