Hayward TriStar® VS Owners Manual - Page 7
Operation & Setup
 |
View all Hayward TriStar® VS manuals
Add to My Manuals
Save this manual to your list of manuals |
Page 7 highlights
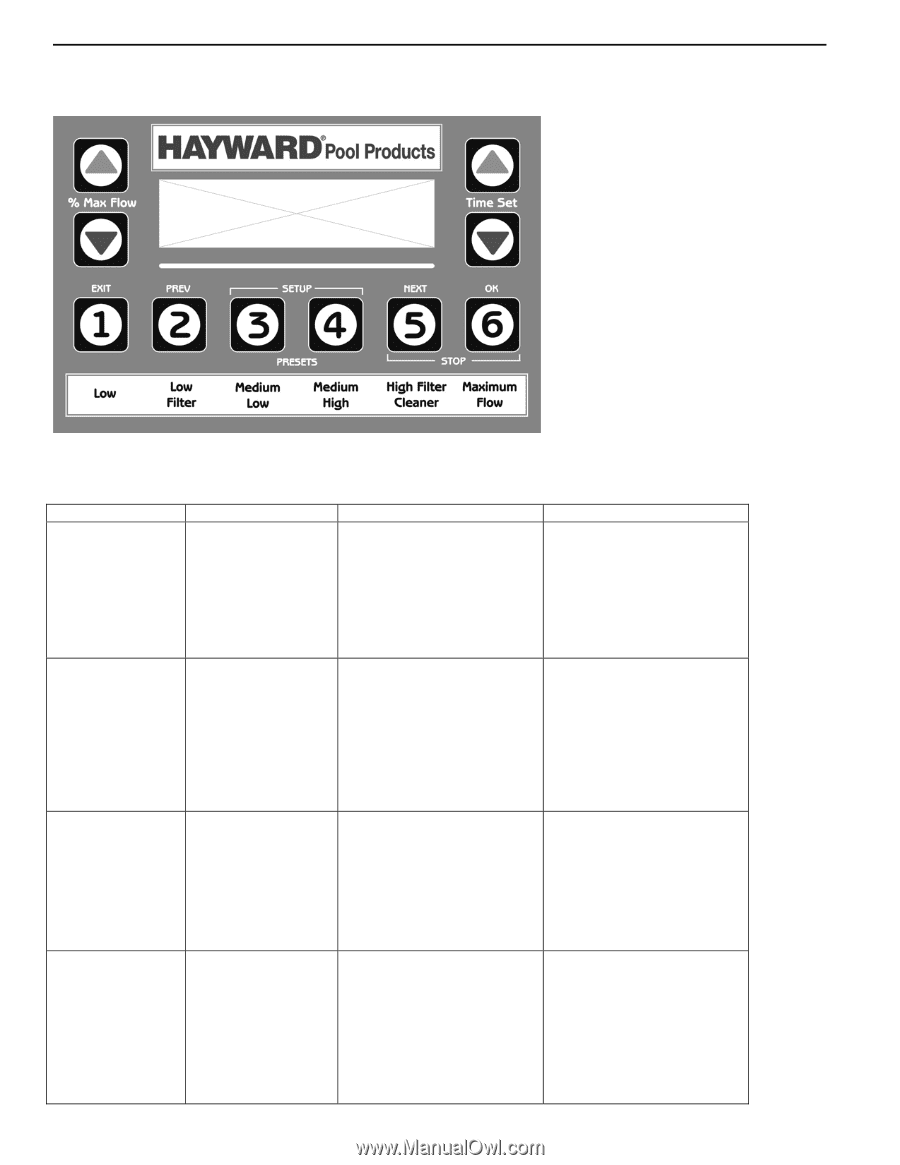
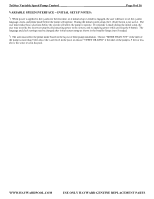
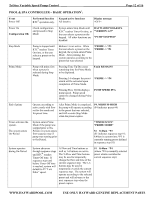
TriStar Variable Speed Pump Control ____ Operation & Setup Page 7 of 16 VARIABLE SPEED INTERFACE - INSTALLER INITIAL SETUP1: Event Performed function Initial Power On. System checks to determine if initial Or setup parameters were previously set. If not, Initial Setup Override system enters Select (pressing 4 during Language step of initial Power On). setup procedure. Keypad active functions Press Time Up/Dn button to select desired language. Press 6 (OK) to store current settings. Display message SELECT LANGUAGE *ENGLISH *ESPANOL *FRANCAIS Language selection is Clock setup. complete. Press 5 (Next) or 2 (Previous) buttons to select day of week, hours, and minutes settings. Press Time Up/Dn buttons to change the selected value (selected value will be displayed with underlining cursor). Press 6 (OK) to store current settings. CHECK THE CLOCK *SET Mon 12:50pm Clock setting is complete. Prime Mode setup. Press Time Up/Dn buttons to select desired prime mode2 (prime mode should be selected based on height of pump inlet above water level in pool). Press 6 (OK) to store current settings. PICK PRIME MODE *MORE THAN 5 FT *5 FEET OR LESS Prime mode selection is complete. Timer disabled: pump runs according to prime mode selected, and defaults to P2. Timer enabled: pump remains stopped until system time reaches Timer-On setting. Use 1 - 6 buttons to switch pump to a preset mode. Use Time Up/Dn buttons to cause remaining time for current mode to increase/decrease by 5 minutes. Use % Flow Up/Dn buttons to change pump speed within predefined range. *PRIME MODE* (when timer is disabled) *PUMP STOPPED* (when timer is enabled, until system time reaches Timer-On setting) WWW.HAYWARDPOOL.COM USE ONLY HAYWARD GENUINE REPLACEMENT PARTS
-
 1
1 -
 2
2 -
 3
3 -
 4
4 -
 5
5 -
 6
6 -
 7
7 -
 8
8 -
 9
9 -
 10
10 -
 11
11 -
 12
12 -
13
-
14
-
15
-
16
 |
 |