HealthRider Hotel Fitness Rb9800-e Bike English Manual - Page 24
How To Use The Maintenance Mode
 |
View all HealthRider Hotel Fitness Rb9800-e Bike manuals
Add to My Manuals
Save this manual to your list of manuals |
Page 24 highlights
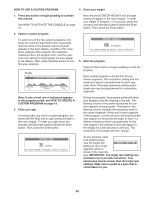
HOW TO USE THE MAINTENANCE MODE The console features a maintenance mode that allows you to access usage information and to view and change default settings. 1. Press any button or begin pedaling to activate the console. See HOW TO ACTIVATE THE CONSOLE on page 12. 2. Select the maintenance mode. Hold down the Clear button and the Enter button simultaneously for a few seconds to select the maintenance mode. When the maintenance mode is selected, the words MAINTENANCE MODE SCREEN 1 will appear in the main display. Note: As you view the maintenance mode screens, press the Back button at any time to return to the previous screen. 3. View usage information for the exercise bike. When the words MAINTENANCE MODE SCREEN 1 appear, the main display will show the total number of hours that the exercise bike has been used and the total distance that the exercise bike has been pedaled. If the pedals on the exercise bike do not move for a period of time, a pause timeout will occur and the console will enter an idle mode. When the console is in the idle mode, the displays will be reset to zeros and a screen saver will appear in the main display. The pause timeout can occur from 1 minute to 5 minutes after the pedals stop moving. To change the length of time that will elapse before the pause timeout, press the increase and decrease buttons beside the Enter button. 5. Change the console settings if desired. Press the Display button again. When the words MAINTENANCE MODE SCREEN 3 appear, the main display will allow you to set a default input and a default volume level. You can set the default input for the console as MP3, TV, or RCA. To change the default input, press the increase and decrease buttons beside the Enter button. Then, press the Display button. Note: The TV and RCA input options are for use with the optional Workout TV (see page 10). The console has several volume levels. To change the volume level, press the increase and decrease buttons beside the Enter button. 6. Select a language for the main display. Press the Display button again. The main display may be able to display text messages in other languages. To change the language, press the increase and decrease buttons beside the Enter button. Then press the Display button. 7. Change the settings for a custom program if desired. 4. Change the time settings if desired. Press the Display button. When the words MAINTENANCE MODE SCREEN 2 appear, the main display will allow you to set a maximum program time for the programs and a default time for the pause timeout. Press the Display button again. When the words MAINTENANCE MODE SCREEN 4 appear, the main display will allow you to select and change the settings for a custom program. To change the settings for a custom program, see HOW TO CREATE A CUSTOM PROGRAM on page 19. The maximum program time for the programs can be from 10 minutes to 90 minutes. To change the maximum program time, press the increase and decrease buttons beside the Enter button. Then, press the Display button. 8. Exit the maintenance mode. Press the Display button to exit the maintenance mode. 24
-
 1
1 -
2
-
3
-
4
-
5
-
6
-
7
-
8
-
9
-
10
-
11
-
12
-
13
-
14
-
15
-
16
-
17
-
18
-
 19
19 -
 20
20 -
 21
21 -
 22
22 -
 23
23 -
 24
24 -
 25
25 -
 26
26 -
 27
27 -
 28
28 -
 29
29 -
30
-
31
-
32
 |
 |
