HP 10636 HP 10000 G2 Series Rack Options Installation Guide - Page 21
Installation is complete., rack with the adhesive strip facing the front of the rack.
 |
View all HP 10636 manuals
Add to My Manuals
Save this manual to your list of manuals |
Page 21 highlights
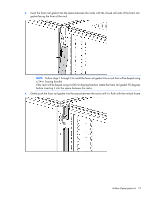
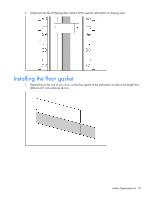
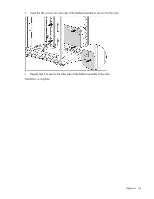
2. Remove the protective tape from the bottom edge of the floor gasket, and apply it to the bottom of the rack with the adhesive strip facing the front of the rack. Installation is complete. Airflow Optimization kit 21
-
 1
1 -
2
-
3
-
4
-
5
-
6
-
7
-
8
-
9
-
10
-
11
-
12
-
13
-
14
-
15
-
 16
16 -
 17
17 -
 18
18 -
 19
19 -
 20
20 -
 21
21 -
 22
22 -
 23
23 -
 24
24 -
 25
25 -
 26
26 -
27
-
28
-
29
-
30
-
31
-
32
-
33
-
34
-
35
-
36
-
37
-
38
-
39
-
40
-
41
-
42
-
43
-
44
-
45
-
46
-
47
-
48
-
49
-
50
-
51
-
52
-
53
-
54
-
55
-
56
-
57
-
58
-
59
-
60
-
61
-
62
-
63
-
64
-
65
-
66
-
67
-
68
-
69
-
70
-
71
-
72
-
73
-
74
-
75
-
76
-
77
-
78
-
79
-
80
-
81
-
82
-
83
-
84
-
85
-
86
-
87
-
88
-
89
-
90
-
91
-
92
-
93
-
94
-
95
-
96
-
97
-
98
-
99
-
100
-
101
-
102
-
103
-
104
-
105
-
106
-
107
-
108
-
109
-
110
-
111
-
112
-
113
-
114
-
115
-
116
-
117
-
118
-
119
-
120
-
121
-
122
-
123
-
124
-
125
-
126
-
127
-
128
-
129
 |
 |

Airflow Optimization kit 21
2.
Remove the protective tape from the bottom edge of the floor gasket, and apply it to the bottom of the
rack with the adhesive strip facing the front of the rack.
Installation is complete.