HP 10636 HP 10000 G2 Series Rack Options Installation Guide - Page 29
Installing the 1U cable management bracket
 |
View all HP 10636 manuals
Add to My Manuals
Save this manual to your list of manuals |
Page 29 highlights
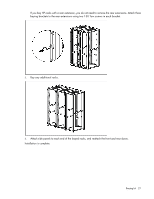
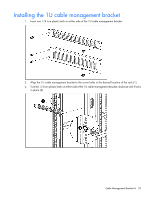
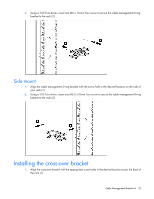
Installing the 1U cable management bracket 1. Insert one 1/4 turn plastic latch on either side of the 1U cable management bracket. 2. Align the 1U cable management bracket to the screw holes in the desired location of the rack (1). 3. Turn the 1/4 turn plastic latch on either side of the 1U cable management bracket clockwise until it locks in place (2). Cable Management Bracket kit 29
-
 1
1 -
2
-
3
-
4
-
5
-
6
-
7
-
8
-
9
-
10
-
11
-
12
-
13
-
14
-
15
-
16
-
17
-
18
-
19
-
20
-
21
-
22
-
23
-
 24
24 -
 25
25 -
 26
26 -
 27
27 -
 28
28 -
 29
29 -
 30
30 -
 31
31 -
 32
32 -
 33
33 -
 34
34 -
35
-
36
-
37
-
38
-
39
-
40
-
41
-
42
-
43
-
44
-
45
-
46
-
47
-
48
-
49
-
50
-
51
-
52
-
53
-
54
-
55
-
56
-
57
-
58
-
59
-
60
-
61
-
62
-
63
-
64
-
65
-
66
-
67
-
68
-
69
-
70
-
71
-
72
-
73
-
74
-
75
-
76
-
77
-
78
-
79
-
80
-
81
-
82
-
83
-
84
-
85
-
86
-
87
-
88
-
89
-
90
-
91
-
92
-
93
-
94
-
95
-
96
-
97
-
98
-
99
-
100
-
101
-
102
-
103
-
104
-
105
-
106
-
107
-
108
-
109
-
110
-
111
-
112
-
113
-
114
-
115
-
116
-
117
-
118
-
119
-
120
-
121
-
122
-
123
-
124
-
125
-
126
-
127
-
128
-
129
 |
 |

Cable Management Bracket kit
29
Installing the 1U cable management bracket
1.
Insert one 1/4 turn plastic latch on either side of the 1U cable management bracket.
2.
Align the 1U cable management bracket to the screw holes in the desired location of the rack (1).
3.
Turn the 1/4 turn plastic latch on either side of the 1U cable management bracket clockwise until it locks
in place (2).