HP 15-ay100 17-x099 Models: 17-x100 - 17-x199 - Maintenance and Service Guide - Page 50
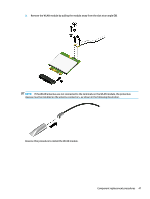
Remove the 14 Phillips PM PM2.5×8.0 screws
 |
View all HP 15-ay100 manuals
Add to My Manuals
Save this manual to your list of manuals |
Page 50 highlights
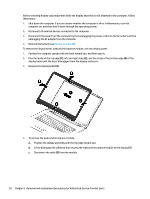
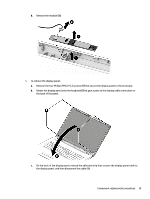
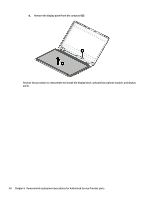
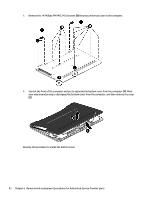
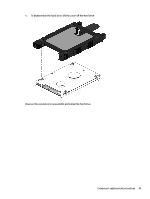
4. Remove the 14 Phillips PM PM2.5×8.0 screws (3) that secure the top cover to the computer. 5. Start at the front of the computer and pry to separate the bottom cover from the computer (1). Work your way around prying to disengage the bottom cover from the computer, and then remove the cover (2). Reverse this procedure to install the bottom cover. 42 Chapter 6 Removal and replacement procedures for Authorized Service Provider parts
-
 1
1 -
2
-
3
-
4
-
5
-
6
-
7
-
8
-
9
-
10
-
11
-
12
-
13
-
14
-
15
-
16
-
17
-
18
-
19
-
20
-
21
-
22
-
23
-
24
-
25
-
26
-
27
-
28
-
29
-
30
-
31
-
32
-
33
-
34
-
35
-
36
-
37
-
38
-
39
-
40
-
41
-
42
-
43
-
44
-
 45
45 -
 46
46 -
 47
47 -
 48
48 -
 49
49 -
 50
50 -
 51
51 -
 52
52 -
 53
53 -
 54
54 -
 55
55 -
56
-
57
-
58
-
59
-
60
-
61
-
62
-
63
-
64
-
65
-
66
-
67
-
68
-
69
-
70
-
71
-
72
-
73
-
74
-
75
-
76
-
77
-
78
-
79
-
80
-
81
-
82
-
83
-
84
-
85
-
86
-
87
-
88
-
89
-
90
-
91
-
92
-
93
-
94
-
95
-
96
-
97
-
98
-
99
-
100
-
101
-
102
-
103
-
104
-
105
-
106
-
107
-
108
-
109
-
110
-
111
-
112
-
113
-
114
 |
 |

4.
Remove the 14 Phillips PM PM2.5×8.0 screws
(3)
that secure the top cover to the computer.
5.
Start at the front of the computer and pry to separate the bottom cover from the computer
(1)
. Work
your way around prying to disengage the bottom cover from the computer, and then remove the cover
(2)
.
Reverse this procedure to install the bottom cover.
42
Chapter 6
Removal and replacement procedures for Authorized Service Provider parts