HP 4370 User's Manual - Page 9
Scan multiple pictures with one scan - scanjet
 |
View all HP 4370 manuals
Add to My Manuals
Save this manual to your list of manuals |
Page 9 highlights
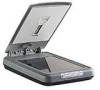
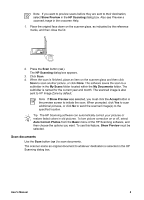
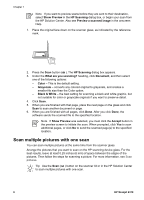
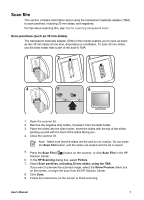
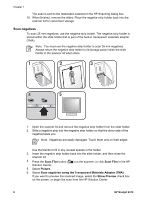
Chapter 1 Note If you want to preview scans before they are sent to their destination, select Show Preview in the HP Scanning dialog box, or begin your scan from the HP Solution Center. Also see Preview a scanned image in the onscreen Help. 1. Place the original face down on the scanner glass, as indicated by the reference mark. 2. Press the Scan button ( ). The HP Scanning dialog box appears. 3. Under the What are you scanning? heading, click Document, and then select one of the following options: - Color - This is the default setting. - Grayscale - converts any colored original to grayscale, and creates a smaller file size than the Color option. - Black & White - the best setting for scanning a black and white graphic, but not suitable for color or grayscale originals if you want to preserve detail. 4. Click Scan. 5. When you are finished with that page, place the next page on the glass and click Scan to scan another document or page. 6. When you are finished with all pages, click Done. After you click Done, the software sends the scanned file to the specified location. Note If Show Preview was selected, you must click the Accept button in the preview screen to initiate the scan. When prompted, click Yes to scan additional pages, or click No to send the scanned page(s) to the specified location. Scan multiple pictures with one scan You can scan multiple pictures at the same time from the scanner glass. Arrange the pictures that you want to scan on the HP scanning device glass. For the best results, leave at least 0.25 inches (6 mm) of space between the edges of the pictures. Then follow the steps for scanning a picture. For more information, see Scan pictures. Tip Use the Scan ( ) button on the scanner lid or in the HP Solution Center to scan multiple pictures with one scan. 6 HP Scanjet 4370
-
 1
1 -
2
-
3
-
 4
4 -
 5
5 -
 6
6 -
 7
7 -
 8
8 -
 9
9 -
 10
10 -
 11
11 -
 12
12 -
 13
13 -
 14
14 -
15
-
16
-
17
-
18
-
19
-
20
-
21
 |
 |