HP 5530 hp scanjet 5530 digital flatbed scanner user manual - Page 11
share a scanned picture using HP Instant Share, create a picture show and save it on CD - software
 |
UPC - 808736552165
View all HP 5530 manuals
Add to My Manuals
Save this manual to your list of manuals |
Page 11 highlights
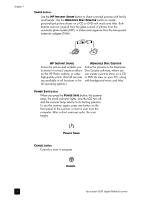
how to use the scanner share a scanned picture using HP Instant Share Use the HP INSTANT SHARE button ( ) on the front of the scanner to share scanned pictures with family and friends. You can easily 1) send someone an email with thumbnails and links to your pictures stored on a secure HP website - no more attachments; 2) upload pictures to the HP Photo website to create online picture albums; or 3) order professional-quality prints from an HP partner web site. (Not all services are available in all regions or for all operating systems.) You must be connected to the Internet to use HP Instant Share. Note: Macintosh users, see the HP Photo & Imaging software Help for information about using the HP INSTANT SHARE button. Note: Use the HP INSTANT SHARE button to scan and share only pictures. If you want to scan and share a document, use the SCAN DOCUMENT ( ) button on the scanner. 1 Place the original face down on the scanner glass as indicated by the reference marks on the scanner. 2 Press the HP INSTANT SHARE button ( ) on the front of the scanner to start the scan. 3 A dialog box appears, asking if you want to scan another image. Follow the instructions on the screen. 4 All your scanned pictures are sent to the HP Instant Share software. Follow the instructions on the screen to share your scanned picture. Note: By default, the software does not prompt you to preview the picture when you use the HP INSTANT SHARE button on the scanner. If you want to preview the picture, use the HP Director instead of the HP INSTANT SHARE button on the scanner. You can also use the HP INSTANT SHARE button to scan pictures from the automatic photo feeder (APF), and 35 mm slides or negatives from the transparent materials adapter (TMA). You can also access HP Instant Share using the software. For more information, see the HP Photo & Imaging software Help. create a picture show and save it on CD Use the MEMORIES DISC CREATOR button ( ) on the front panel of your HP scanner to create personalized picture shows on a CD or DVD with music and titles. Then you can watch the picture show on your television using a compatible digital versatile disc (DVD) or video compact disc (VCD) player. You can also make picture reprints from the CD. (You must have an Intel® Pentium II processor or above, 700MB of free disk space, a read/write CD-ROM drive and writable CDs to use Memories Disc Creator.) 1 Place the original face down on the scanner glass as indicated by the reference marks on the scanner, and close the lid. 2 Press the MEMORIES DISC CREATOR button ( ) on the scanner. Select whether you are scanning from the scanner glass or from the transparent materials adapter (TMA), then click Scan. user's manual 6
-
 1
1 -
2
-
3
-
4
-
5
-
 6
6 -
 7
7 -
 8
8 -
 9
9 -
 10
10 -
 11
11 -
 12
12 -
 13
13 -
 14
14 -
 15
15 -
 16
16 -
17
-
18
-
19
-
20
-
21
-
22
-
23
-
24
-
25
-
26
-
27
-
28
-
29
-
30
-
31
-
32
-
33
-
34
-
35
-
36
-
37
-
38
 |
 |