HP 6125XLG R2306-HP 6125XLG Blade Switch EVB Configuration Guide - Page 15
The VSI type, VSI Type List
 |
View all HP 6125XLG manuals
Add to My Manuals
Save this manual to your list of manuals |
Page 15 highlights
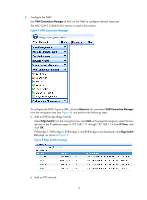
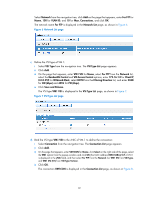
Select Network from the navigation tree, click Add on the page that appears, enter For FTP for Name, 100 for VLAN ID, and 10 for Max. Connections, and click OK. The network name For FTP is displayed in the Network List page, as shown in Figure 6. Figure 6 Network List page c. Define the VSI type of VM 1: i Select VSI Type from the navigation tree. The VSI Type List page appears. ii Click Add. iii On the page that appears, enter VM1 VSI for Name, select For FTP from the Network list, select the Bandwidth Control and VM Access Control options, enter 172.16.1.0 for Client IP, 0.0.0.255 for Wildcard Mask, select BOTH from the Filtering Direction list, and enter 2048 for CIR (kbps) and 4096 for PIR (kbps). iv Click Save and Release. The VSI type VM1 VSI is displayed in the VSI Type List page, as shown in Figure 7. Figure 7 VSI Type List page d. Bind the VSI type VM1 VSI to the vNIC of VM 1 to define the connection: i Select Connection from the navigation tree. The Connection List page appears. ii Click Add. iii On the page that appears, enter VM1CON for Name, click Select on the right side of the page, select the VM1 option from the popup window and click OK (the MAC address 0050-5684-21c7 of VM 1 is displayed in the vNIC field), and then select For FTP from the Network list, VM1 VSI from VSI Type, and VM1 VSI (V1) from VSI Type Version. iv Click OK. The connection VM1CON is displayed in the Connection List page, as shown in Figure 8. 12
-
 1
1 -
2
-
3
-
4
-
5
-
6
-
7
-
8
-
9
-
 10
10 -
 11
11 -
 12
12 -
 13
13 -
 14
14 -
 15
15 -
 16
16 -
 17
17 -
 18
18 -
 19
19 -
 20
20 -
21
 |
 |
