HP Business Inkjet 3000 HP Business Inkjet 3000 series printers - (English) Us - Page 43
Setting printer options, Understanding the LCD control panel - help
 |
View all HP Business Inkjet 3000 manuals
Add to My Manuals
Save this manual to your list of manuals |
Page 43 highlights
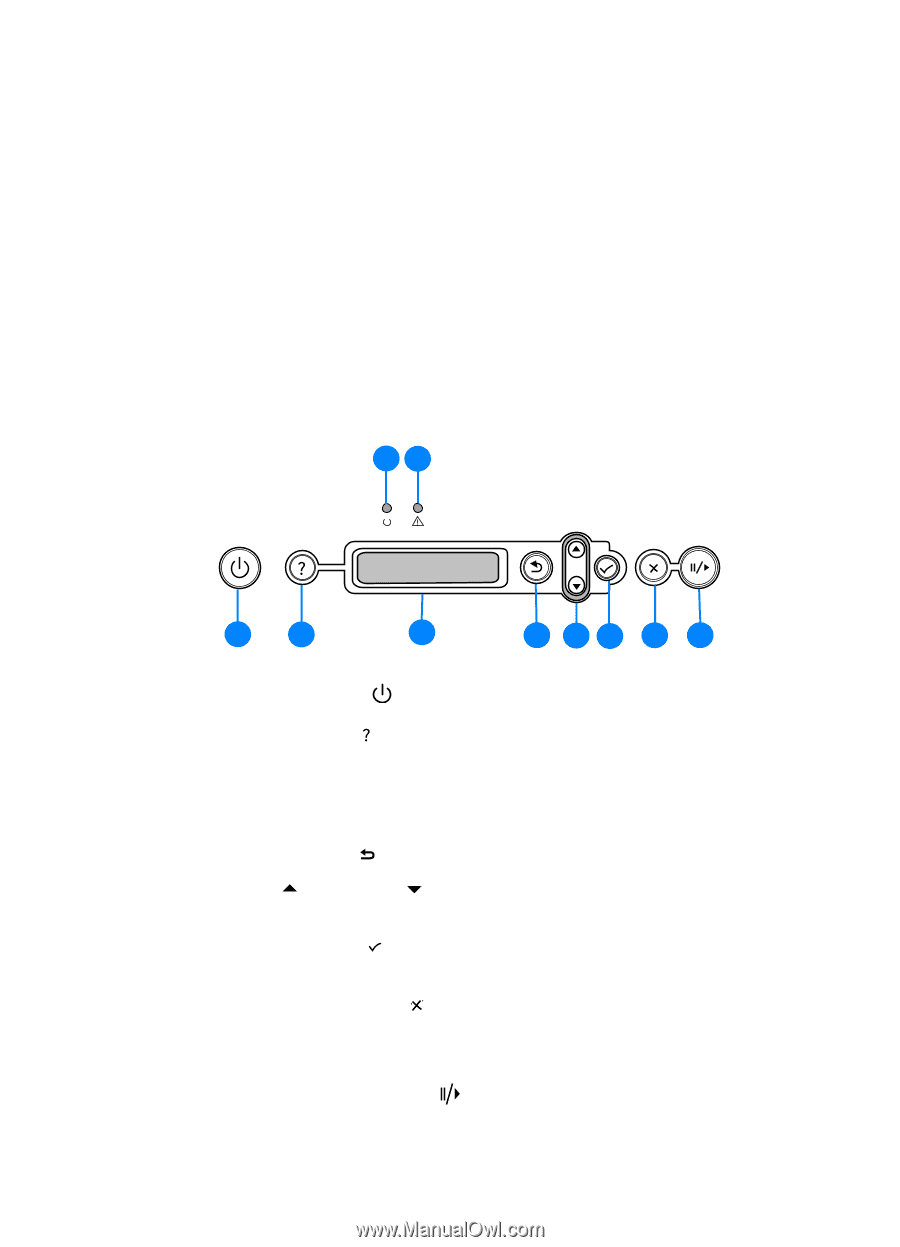
4 Setting printer options The LCD control panel allows you to change printer settings, view printer status and printer messages, and diagnose printer problems. Additional menu items can appear in the LCD control panel, depending on the options installed in the printer. Understanding the LCD control panel 9 10 ENWW 1 2 3 4 56 7 8 1 Power button ( ): Turns the printer off and on. 2 Help button ( ): Provides additional information about printer messages or menus. 3 LCD display: Shows status and error messages, as well as ink cartridge levels. 4 Back button ( ): Navigates backward one level in the menus. 5 Up ( ) and down ( ) arrow button: Navigates through menu items and increases or decreases numerical values. 6 Select button ( ): Selects highlighted menu items. This button also restarts printing after continuable errors. 7 Cancel job button ( ): Cancels the current print job. The time it takes to cancel depends on the size of the print job. Press this button only once to cancel the current print job. 8 Pause/resume button ( ): Temporarily stops and restarts printing. This button also exits the menus and exits the LCD control panel help. 4-1
-
 1
1 -
2
-
3
-
4
-
5
-
6
-
7
-
8
-
9
-
10
-
11
-
12
-
13
-
14
-
15
-
16
-
17
-
18
-
19
-
20
-
21
-
22
-
23
-
24
-
25
-
26
-
27
-
28
-
29
-
30
-
31
-
32
-
33
-
34
-
35
-
36
-
37
-
 38
38 -
 39
39 -
 40
40 -
 41
41 -
 42
42 -
 43
43 -
 44
44 -
 45
45 -
 46
46 -
 47
47 -
 48
48 -
49
-
50
-
51
-
52
-
53
-
54
-
55
-
56
-
57
-
58
-
59
-
60
-
61
-
62
-
63
-
64
-
65
-
66
-
67
-
68
-
69
-
70
-
71
-
72
-
73
-
74
-
75
-
76
-
77
-
78
-
79
-
80
-
81
-
82
-
83
-
84
-
85
-
86
-
87
-
88
-
89
-
90
-
91
-
92
-
93
-
94
-
95
-
96
-
97
-
98
-
99
-
100
-
101
-
102
-
103
-
104
-
105
-
106
-
107
-
108
-
109
-
110
-
111
-
112
-
113
-
114
-
115
-
116
-
117
-
118
-
119
-
120
-
121
-
122
-
123
-
124
-
125
-
126
-
127
-
128
-
129
-
130
-
131
-
132
-
133
-
134
-
135
-
136
-
137
-
138
-
139
-
140
-
141
-
142
-
143
-
144
-
145
-
146
-
147
-
148
-
149
-
150
-
151
-
152
-
153
-
154
-
155
-
156
-
157
-
158
-
159
-
160
-
161
-
162
-
163
-
164
-
165
-
166
-
167
-
168
-
169
-
170
-
171
-
172
-
173
-
174
-
175
-
176
-
177
-
178
-
179
-
180
-
181
-
182
-
183
-
184
-
185
-
186
-
187
-
188
-
189
-
190
-
191
-
192
-
193
-
194
-
195
-
196
-
197
-
198
 |
 |