HP C8180 Basics Guide - Page 26
Scan an image, Scan an original to a computer - photosmart help
 |
UPC - 883585123384
View all HP C8180 manuals
Add to My Manuals
Save this manual to your list of manuals |
Page 26 highlights
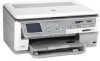
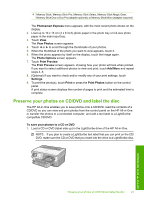
Chapter 3 2. Insert a memory card into the appropriate slot on the HP All-in-One, or connect a storage device to the front USB port. The Photosmart Express menu appears, with the most recent photo shown on the display. 3. Touch Save. The Save Photos menu appears. 4. Touch Save to CD/DVD. When the photos have been saved to the CD or DVD, the Photosmart Express menu appears. TIP: You can also save photos to a CD or DVD by touching CD/DVD on the main screen, then choosing Backup Memory Card in the LightScribe CD/DVD menu. To create a LightScribe disc label 1. On the Photosmart Express menu, touch Create. 2. On the Create screen, touch or to scroll through the projects until you find LightScribe Labeling, then touch this project. 3. When prompted, load a LightScribe CD or DVD with the label side down. The visual keyboard appears. 4. Use the visual keyboard to enter titles and subtitles that identify your CD or DVD, and touch Done on the visual keyboard when you are finished. 5. In the Label Summary screen, touch Burn. At the printing status screen, touch Return to Main Menu to continue with any nondisc tasks while disc labeling continues in the background. For more information on how to read or burn a CD/DVD, or use the LightScribe functions see the onscreen Help. Scan an image You can start a scan from your computer or from the control panel of the HP All-in-One. This section explains how to scan from the control panel of the HP All-in-One only. NOTE: You can also use the software you installed with the HP All-in-One to scan images. Using this software, you can edit a scanned image and create special projects using a scanned image. Scan an original to a computer You can scan originals placed on the glass by using the control panel. 24 Use the HP All-in-One features Use the HP All-in-One features
-
 1
1 -
2
-
3
-
4
-
5
-
6
-
7
-
8
-
9
-
10
-
11
-
12
-
13
-
14
-
15
-
16
-
17
-
18
-
19
-
20
-
 21
21 -
 22
22 -
 23
23 -
 24
24 -
 25
25 -
 26
26 -
 27
27 -
 28
28 -
 29
29 -
 30
30 -
 31
31 -
32
-
33
-
34
-
35
-
36
-
37
-
38
-
39
-
40
-
41
-
42
-
43
 |
 |