HP C8452A HP Photosmart 315 digital camera - (English) User Guide - Page 12
Step 4: Set the camera date and time
 |
View all HP C8452A manuals
Add to My Manuals
Save this manual to your list of manuals |
Page 12 highlights
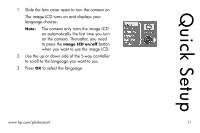
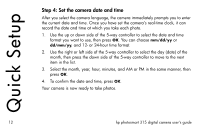
Quick Setup Step 4: Set the camera date and time After you select the camera language, the camera immediately prompts you to enter the current date and time. Once you have set the camera's real-time clock, it can record the date and time at which you take each photo. 1. Use the up or down side of the 5-way controller to select the date and time format you want to use, then press OK. You can choose mm/dd/yy or dd/mm/yy, and 12- or 24-hour time format. 2. Use the right or left side of the 5-way controller to select the day (date) of the month, then press the down side of the 5-way controller to move to the next item in the list. 3. Select the month, year, hour, minutes, and AM or PM in the same manner, then press OK. 4. To confirm the date and time, press OK. Your camera is now ready to take photos. 12 hp photosmart 315 digital camera user's guide
-
 1
1 -
2
-
3
-
4
-
5
-
6
-
 7
7 -
 8
8 -
 9
9 -
 10
10 -
 11
11 -
 12
12 -
 13
13 -
 14
14 -
 15
15 -
 16
16 -
 17
17 -
18
-
19
-
20
-
21
-
22
-
23
-
24
-
25
-
26
-
27
-
28
-
29
-
30
-
31
-
32
-
33
-
34
-
35
-
36
-
37
-
38
-
39
-
40
-
41
-
42
-
43
-
44
-
45
-
46
-
47
-
48
-
49
-
50
-
51
-
52
-
53
-
54
-
55
-
56
-
57
-
58
-
59
-
60
-
61
-
62
-
63
-
64
-
65
-
66
-
67
-
68
-
69
-
70
-
71
-
72
-
73
-
74
-
75
-
76
-
77
-
78
-
79
-
80
-
81
-
82
-
83
-
84
-
85
-
86
-
87
-
88
-
89
-
90
-
91
-
92
-
93
-
94
-
95
-
96
-
97
-
98
-
99
-
100
-
101
-
102
-
103
-
104
-
105
-
106
-
107
-
108
-
109
-
110
-
111
-
112
 |
 |
