HP Chromebook x360 14 G1 Maintenance and Service Guide - Page 10
Left side
 |
View all HP Chromebook x360 14 G1 manuals
Add to My Manuals
Save this manual to your list of manuals |
Page 10 highlights
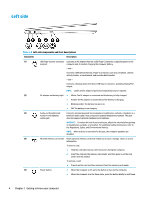
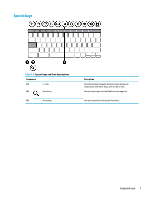
Left side Table 2-2 Left-side components and their descriptions Component Description (1) USB Type-C power connector Connects an AC adapter that has a USB Type-C connector, supplying power to the and port computer and, if needed, charging the computer battery. - and - Connects a USB device that has a Type-C connector, such as a cell phone, camera, activity tracker, or smartwatch, and provides data transfer. - and - Connects a display device that has a USB Type-C connector, providing DisplayPort output. NOTE: Cables and/or adapters (purchased separately) may be required. (2) AC adapter and battery light ● White: The AC adapter is connected and the battery is fully charged. ● Amber: The AC adapter is connected and the battery is charging. ● Blinking amber: The battery has an error. ● Off: The battery is not charging. (3) Audio-out (headphone)/ Connects optional powered stereo speakers, headphones, earbuds, a headset, or a Audio-in (microphone) television audio cable. Also connects an optional headset microphone. This jack combo jack does not support optional standalone microphones. WARNING! To reduce the risk of personal injury, adjust the volume before putting on headphones, earbuds, or a headset. For additional safety information, refer to the Regulatory, Safety, and Environmental Notices. NOTE: When a device is connected to the jack, the computer speakers are disabled. (4) MicroSD memory card reader Reads optional memory cards that enable you to store, manage, share, or access information. To insert a card: 1. Hold the card label-side up, with connectors facing the computer. 2. Insert the card into the memory card reader, and then press in on the card until it is firmly seated. To remove a card: ▲ Press in on the card, and then remove it from the memory card reader. (5) Power button ● When the computer is off, press the button to turn on the computer. ● When the computer is in the Sleep state, press the button briefly to exit Sleep. 4 Chapter 2 Getting to know your computer
-
 1
1 -
2
-
3
-
4
-
 5
5 -
 6
6 -
 7
7 -
 8
8 -
 9
9 -
 10
10 -
 11
11 -
 12
12 -
 13
13 -
 14
14 -
 15
15 -
16
-
17
-
18
-
19
-
20
-
21
-
22
-
23
-
24
-
25
-
26
-
27
-
28
-
29
-
30
-
31
-
32
-
33
-
34
-
35
-
36
-
37
-
38
-
39
-
40
-
41
-
42
-
43
-
44
-
45
-
46
-
47
-
48
-
49
-
50
-
51
-
52
-
53
-
54
-
55
-
56
-
57
 |
 |
