HP Color LaserJet Enterprise flow MFP M880 Hole Punch Kit Installation Guide - Page 10
Set the sensor adjustment values.
 |
View all HP Color LaserJet Enterprise flow MFP M880 manuals
Add to My Manuals
Save this manual to your list of manuals |
Page 10 highlights
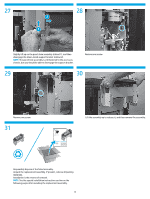
13 Set the sensor adjustment values. Follow the steps below to adjust the sensors on the punch controller PCA. 14 15 2 1 34 5 Make sure that the product power is off. 16 ON 1234 Set SW601 to the settings above. Locate the switches and LEDs on the punch controller PCA. • SW601 (callout 1) • LED602 (callout 2) • LED601 (callout 3) • SW602 (callout 4) • SW603 (callout 5) NOTE: SW601 has four electronic switches that can be configure in the ON or OFF position. The punch controller PCA is marked ON and OFF to show the current switch position. 17 Turn the product power on. 10
-
 1
1 -
2
-
3
-
4
-
 5
5 -
 6
6 -
 7
7 -
 8
8 -
 9
9 -
 10
10 -
 11
11 -
 12
12
 |
 |

10
13
14
15
1
4
5
2
3
16
1
ON
2
3
4
17
Set the sensor adjustment values.
Follow the steps below to adjust the sensors on the punch
controller PCA.
Make sure that the product power is off.
Locate the switches and LEDs on the punch controller PCA.
•
SW601 (callout 1)
•
LED602 (callout 2)
•
LED601 (callout 3)
•
SW602 (callout 4)
•
SW603 (callout 5)
NOTE
: SW601 has four electronic switches that can be configure
in the ON or OFF position. The punch controller PCA is marked ON
and OFF to show the current switch position.
Set SW601 to the settings above.
Turn the product power on.