HP D7560 Basic Guide - Page 23
The product is printing on a non-printable area of my disc, Solution 1: Change the software settings
 |
UPC - 883585923687
View all HP D7560 manuals
Add to My Manuals
Save this manual to your list of manuals |
Page 23 highlights
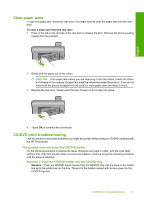
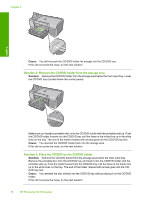
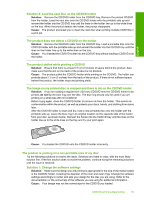
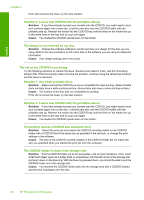
English Solution 4: Load the next disc on the CD/DVD holder Solution: Remove the CD/DVD holder from the CD/DVD tray. Remove the printed CD/DVD from the holder. Load the next disc onto the CD/DVD holder with the printable side up and reinsert the holder into the CD/DVD tray until the lines on the holder line up to the white lines on the tray. When the product detects the holder, the prompt disappears. Cause: The product prompted you to insert the next disc when printing multiple CD/DVDs in a print job. The product does not detect a CD/DVD on the holder Solution: Remove the CD/DVD holder from the CD/DVD tray. Load a printable disc onto the CD/DVD holder with the printable side up and reinsert the holder into the CD/DVD tray until the lines on the holder line up to the white lines on the tray. Cause: You inserted the CD/DVD holder into the CD/DVD tray without loading a CD/DVD onto the holder. The product stalled while printing a CD/DVD Solution: Ensure that there is at least 7.5 cm (3 inches) of space behind the product. Also, make sure that the slot on the back of the product is not blocked. Cause: The product pulled the CD/DVD holder while printing on the CD/DVD. The holder can protrude about 7.5 cm (3 inches) from the back of the product. If there is not sufficient space behind the product, the holder stops and printing stalls. The image on my printed disc is cropped and there is ink on the CD/DVD holder Solution: If you are loading a regular-size (120 mm) CD/DVD onto the CD/DVD holder to be printed, do not flip the blue ring over the disc. The blue ring should only be used if you are printing on a small-size (80 mm) CD/DVD. Before trying again, clean the CD/DVD holder to remove ink from the holder. This avoids ink contamination within the product, as well as protects your discs, hands, and clothing from stains later. After the CD/DVD holder is clean and dry, load a new printable disc onto the holder with the printable side up. Leave the blue ring in its original location on the opposite side of the holder from your disc, as shown below. Reinsert the holder into the CD/DVD tray until the lines on the holder line up to the white lines on the tray and try your print again. Cause: You loaded the CD/DVD onto the CD/DVD holder incorrectly. The product is printing on a non-printable area of my disc Try the following solutions to resolve the issue. Solutions are listed in order, with the most likely solution first. If the first solution does not solve the problem, continue trying the remaining solutions until the issue is resolved. Solution 1: Change the software settings Solution: Make sure the design you are printing is appropriate for the size of the media loaded in the CD/DVD holder, including the diameter of the inner and outer rings. Change the software settings accordingly to center and size your design for the disc you are using. Refer to the documentation or the online help of the software you are using for additional information. Cause: Your design was not the correct size for the CD/DVD you loaded. CD/DVD print troubleshooting 19
-
 1
1 -
2
-
3
-
4
-
5
-
6
-
7
-
8
-
9
-
10
-
11
-
12
-
13
-
14
-
15
-
16
-
17
-
 18
18 -
 19
19 -
 20
20 -
 21
21 -
 22
22 -
 23
23 -
 24
24 -
 25
25 -
 26
26 -
 27
27 -
 28
28 -
29
-
30
-
31
-
32
-
33
-
34
-
35
-
36
-
37
-
38
-
39
-
40
-
41
-
42
-
43
-
44
-
45
-
46
-
47
-
48
-
49
-
50
-
51
-
52
-
53
-
54
-
55
-
56
-
57
-
58
-
59
-
60
-
61
-
62
-
63
-
64
-
65
-
66
-
67
-
68
-
69
-
70
-
71
-
72
-
73
-
74
-
75
-
76
-
77
-
78
-
79
-
80
-
81
 |
 |
