HP Dc5750 RAID on HP Compaq dc5750 Business PCs - Page 14
to exit and return to the main menu.
 |
UPC - 883585056446
View all HP Dc5750 manuals
Add to My Manuals
Save this manual to your list of manuals |
Page 14 highlights
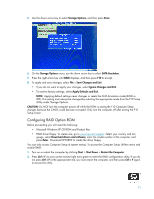
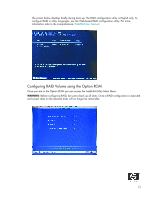
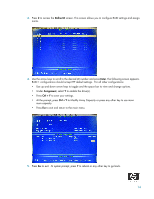
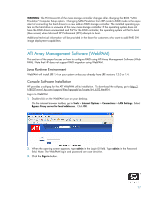
3. Press 2 to access the Define LD screen. This screen allows you to configure RAID settings and assignments. 4. Use the arrow keys to scroll to the desired LD number and press Enter. The following screen appears. RAID 1 configurations should accept HP default settings. For all other configurations: • Use up and down arrow keys to toggle and the space bar to view and change options. • Under Assignment, select Y to enable the drive(s). • Press Ctrl + Y to save your settings. • At the prompt, press Ctrl + Y to Modify Array Capacity or press any other key to use maximum capacity. • Press Esc to exit and return to the main menu. 5. Press Esc to exit. At system prompt, press Y to reboot or any other key to go back. 14
-
 1
1 -
2
-
3
-
4
-
5
-
6
-
7
-
8
-
 9
9 -
 10
10 -
 11
11 -
 12
12 -
 13
13 -
 14
14 -
 15
15 -
 16
16 -
 17
17 -
 18
18 -
 19
19 -
20
 |
 |

14
3.
Press
2
to access the
Define LD
screen. This screen allows you to configure RAID settings and assign-
ments.
4.
Use the arrow keys to scroll to the desired LD number and press
Enter
.
The following screen appears.
RAID 1 configurations should accept HP default settings.
For all other configurations:
•
Use up and down arrow keys to toggle and the space bar to view and change options.
•
Under
Assignment
, select
Y
to enable the drive(s).
•
Press
Ctrl + Y
to save your settings.
•
At the prompt, press
Ctrl + Y
to Modify Array Capacity or press any other key to use maxi-
mum capacity.
•
Press
Esc
to exit and return to the main menu.
5.
Press
Esc
to exit.
At system prompt, press
Y
to reboot or any other key to go back.