HP Dc5750 RAID on HP Compaq dc5750 Business PCs - Page 8
HP Backup and Recovery interactions - raid driver
 |
UPC - 883585056446
View all HP Dc5750 manuals
Add to My Manuals
Save this manual to your list of manuals |
Page 8 highlights
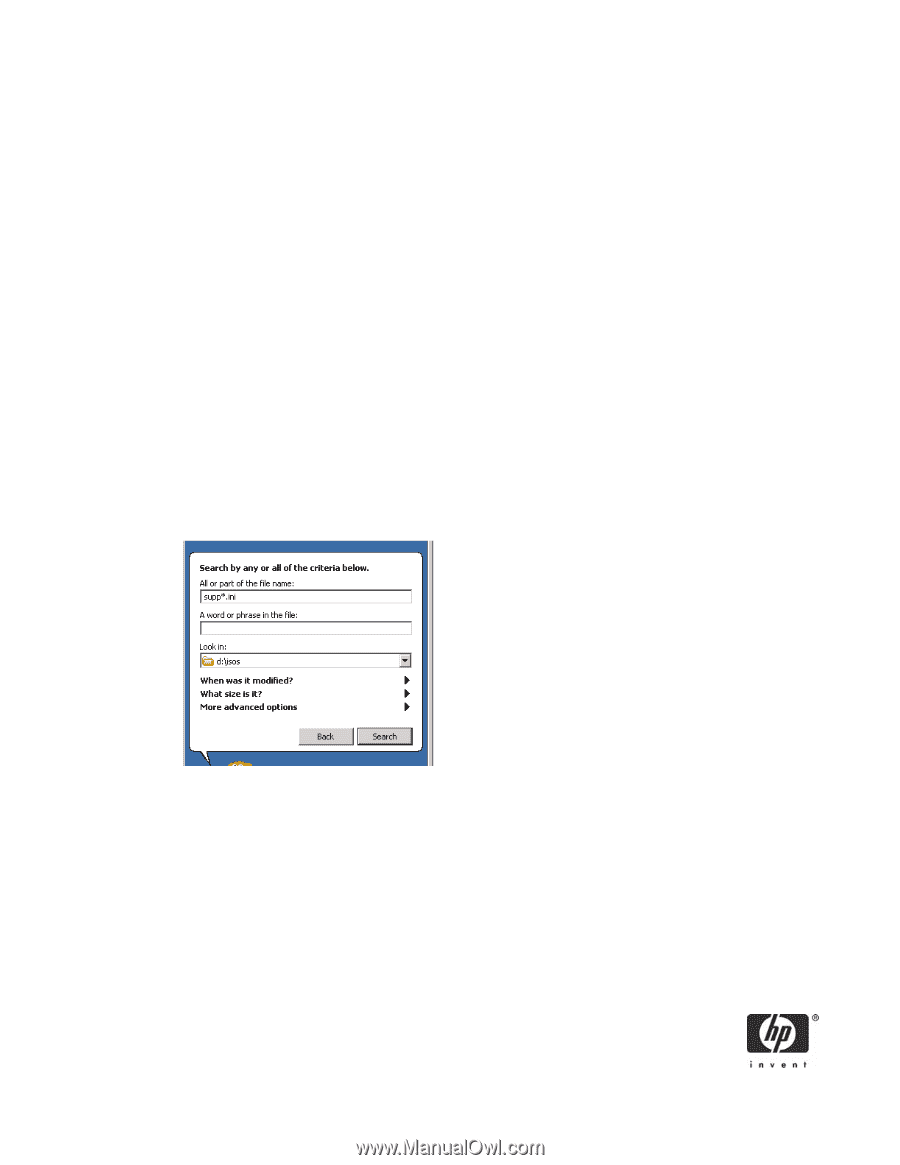
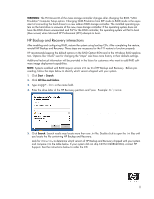
WARNING: The PCI Device ID of the mass storage controller changes after changing the BIOS "SATA Emulation" Computer Setup option. Changing SATA Emulation from IDE mode to RAID mode is the equivalent of connecting the hard drives to a new add-on RAID storage controller. The installed operating system on the hard drive is unaware of this new mass storage controller. If the operating system does not have the RAID drivers enumerated and PnP for the RAID controller, the operating system will fail to boot (blue screen) when Microsoft XP Professional (SP2) attempts to boot. HP Backup and Recovery interactions After enabling and configuring RAID, restore the system using backup CDs. After completing the restore, reinstall HP Backup and Recovery. These steps are necessary for the F11 restore to function properly. HP recommends keeping the default options in the RAID Option ROM and in the Windows RAID application. Options like "chunk" size for changing the "stripe" size have more history in their defaults settings. Additional technical information will be provided in the future for customers who want to add RAID software image deployment capabilities. NOTE: Systems enabled with RAID require version 2.3i rev D of HP Backup and Recovery. Before proceeding, follow the steps below to identify which version shipped with your system. 1. Click Start > Search. 2. Click All files and folders. 3. Type supp*.ini in the name field. 4. Enter the drive letter of the HP Recovery partition and \isos. Example: d:\isos. 5. Click Search. Search results may locate more than one .ini file. Double click to open the .ini files until you locate the file containing HP Backup and Recovery. Look for CDPart#= to determine which version of HP Backup and Recovery shipped with your system and compare it to the table below. If your system did not ship CD Part #408640-B24, contact HP Support. See the instructions below to order the CD. 8
-
 1
1 -
2
-
 3
3 -
 4
4 -
 5
5 -
 6
6 -
 7
7 -
 8
8 -
 9
9 -
 10
10 -
 11
11 -
 12
12 -
 13
13 -
14
-
15
-
16
-
17
-
18
-
19
-
20
 |
 |