HP Designjet 230 Service Manual - Page 188
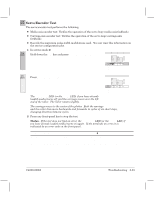
switch the plotter on., Once the the LEDs begin to light up one by one, release
 |
View all HP Designjet 230 manuals
Add to My Manuals
Save this manual to your list of manuals |
Page 188 highlights
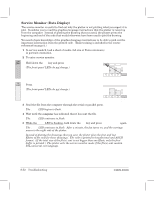
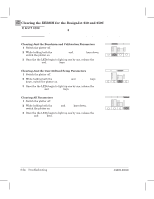
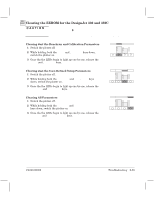
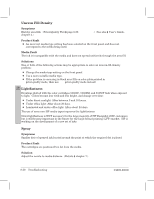
230 250C Clearing the EEROM for the DesignJet 230 and 250C CAUTION If you clear the calibration parameters, you will then need to perform the plotter calibrations. (Details ' chapter 7.) Clearing the EEROM also resets the factory spittoon value to 0% used. Keep in mind that the value printed on the service configuration plot may greatly underestimate the amount of ink in the spittoon. Clearing Just the Benchrun and Calibration Parameters 1 Switch the plotter off. 2 While holding both the Read Settings and Media Type keys down, switch the plotter on. 3 Once the the LEDs begin to light up one by one, release the Read Settings and Media Type keys. Read Settings Media Type Clearing Just the UserĆDefined Setup Parameters 1 Switch the plotter off. 2 While holding both the Align Cartridges and Print Quality keys down, switch the plotter on. 3 Once the the LEDs begin to light up one by one, release the Align Cartridges and Print Quality keys. Align Cartridges Print Quality Clearing All Parameters 1 Switch the plotter off. 2 While holding both the Cancel and Replot keys down, switch the plotter on. 3 Once the the LEDs begin to light up one by one, release the Cancel and Replot keys. Replot Cancel 8Ć54 Troubleshooting C4699Ć90000
-
 1
1 -
2
-
3
-
4
-
5
-
6
-
7
-
8
-
9
-
10
-
11
-
12
-
13
-
14
-
15
-
16
-
17
-
18
-
19
-
20
-
21
-
22
-
23
-
24
-
25
-
26
-
27
-
28
-
29
-
30
-
31
-
32
-
33
-
34
-
35
-
36
-
37
-
38
-
39
-
40
-
41
-
42
-
43
-
44
-
45
-
46
-
47
-
48
-
49
-
50
-
51
-
52
-
53
-
54
-
55
-
56
-
57
-
58
-
59
-
60
-
61
-
62
-
63
-
64
-
65
-
66
-
67
-
68
-
69
-
70
-
71
-
72
-
73
-
74
-
75
-
76
-
77
-
78
-
79
-
80
-
81
-
82
-
83
-
84
-
85
-
86
-
87
-
88
-
89
-
90
-
91
-
92
-
93
-
94
-
95
-
96
-
97
-
98
-
99
-
100
-
101
-
102
-
103
-
104
-
105
-
106
-
107
-
108
-
109
-
110
-
111
-
112
-
113
-
114
-
115
-
116
-
117
-
118
-
119
-
120
-
121
-
122
-
123
-
124
-
125
-
126
-
127
-
128
-
129
-
130
-
131
-
132
-
133
-
134
-
135
-
136
-
137
-
138
-
139
-
140
-
141
-
142
-
143
-
144
-
145
-
146
-
147
-
148
-
149
-
150
-
151
-
152
-
153
-
154
-
155
-
156
-
157
-
158
-
159
-
160
-
161
-
162
-
163
-
164
-
165
-
166
-
167
-
168
-
169
-
170
-
171
-
172
-
173
-
174
-
175
-
176
-
177
-
178
-
179
-
180
-
181
-
182
-
 183
183 -
 184
184 -
 185
185 -
 186
186 -
 187
187 -
 188
188 -
 189
189 -
 190
190 -
 191
191 -
 192
192 -
 193
193 -
194
-
195
-
196
-
197
-
198
-
199
-
200
-
201
-
202
-
203
-
204
-
205
-
206
-
207
-
208
-
209
-
210
-
211
-
212
-
213
-
214
-
215
-
216
-
217
-
218
-
219
-
220
-
221
-
222
-
223
-
224
-
225
-
226
-
227
-
228
-
229
-
230
-
231
-
232
-
233
-
234
-
235
-
236
-
237
-
238
-
239
-
240
-
241
-
242
-
243
-
244
-
245
-
246
-
247
-
248
-
249
-
250
-
251
-
252
-
253
-
254
-
255
-
256
-
257
-
258
-
259
-
260
-
261
-
262
-
263
-
264
-
265
-
266
-
267
-
268
 |
 |