HP Designjet 510 HP Designjet 510 Printer series - Setup Guide: English (US) - Page 4
Insert Ink Cartridges, Replace Set-Up Printheads with Active Printheads - designjet 500
 |
View all HP Designjet 510 manuals
Add to My Manuals
Save this manual to your list of manuals |
Page 4 highlights
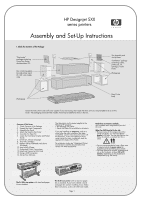
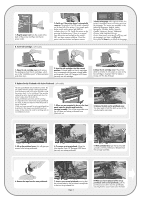
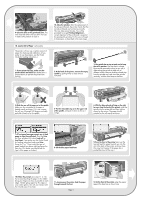
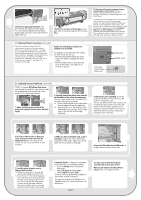
1-Plug the power cord into the socket at the back of the printer and then into the AC power outlet. 8. Insert Ink Cartridges (all models) 2-Switch on if the printer doesn't automatically come on: The printer's On/Off switch is located on the front left of the printer. It is a simple pushbutton switch with a green light (LED) to indicate when it is On. Switch the power on by pressing the button once. If there is no sound from the printer and no light on the switch's LED, you have a power problem. Check the power cord connections and power source. 3-Select a language: After up to a minute, the printer's front-panel menu will invite you to set the language. The menus are available in the following languages: English, Italian, Portuguese, German, French, Spanish, Catalan, Japanese, Korean, Traditional Chinese, and Simplified Chinese. On the front panel, press the or key until the language you want is highlighted. Then press the Enter key to select the language. 1-Open the ink cartridge cover and remove the packaging from the ink cartridges, which are in the "Installation pack" of documentation and other items. 2-Insert the ink cartridges into their correct positions. Colored labels on the ink cartridges must correspond with the same colored labels on the printer. Note: HP Designjet 500 Mono has only one ink cartridge. 3-Close the ink cartridge cover. The printer starts to initialize its ink system as soon as the last cartridge is inserted. Wait for about a minute until this has finished. 9. Replace Set-Up Printheads with Active Printheads (all models) The set-up printheads are provided to protect the ink system while the printer is being transported from the factory, and to fill up the ink tubes inside the printer when it is first initialized. They must be replaced by active (normal) printheads when the printer's tubes have filled with ink. Set-up printheads cannot be used for printing. It is important not to remove the set-up printheads too early, as they are required while the printer is being initialized. When you have removed the set-up printheads (as described in this stage), you should throw them away, as they cannot be used for printing and are not needed any more. 1-When you are prompted to do so in the front panel, open the window and locate the carriage assembly. This will be accessible once the ink tubes and set-up printheads have filled with ink. 2-Release the latch on the printhead cover. You may need to hold this latch up out of the way during the next steps. 3-Lift up the printhead cover; this will give you access to the set-up printheads. 4-To remove a set-up printhead, lift up the blue handle. Note: HP Designjet 500 Mono has only one set-up printhead. 5-With controlled force pull the blue handle upwards until the printhead is released from the carriage assembly. 6-Remove the tape from the new printheads. 7-Insert a new normal printhead ensuring that the colored label on the printhead corresponds to that on the printhead slot. Page 4 8-When you have replaced all the set-up printheads with normal printheads, pull the printhead cover down over the printheads, ensuring that the cover hooks over the latch.
-
 1
1 -
 2
2 -
 3
3 -
 4
4 -
 5
5 -
 6
6 -
 7
7 -
 8
8
 |
 |
