HP Designjet 510 HP Designjet 510 Printer series - Setup Guide: English (US) - Page 6
Install and Connect a LAN Card - network card
 |
View all HP Designjet 510 manuals
Add to My Manuals
Save this manual to your list of manuals |
Page 6 highlights
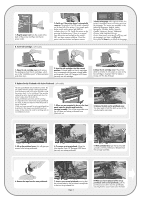
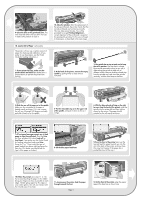
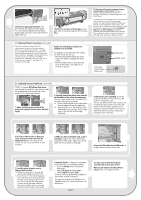
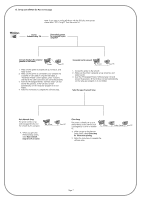
13-Lower the blue paper-load lever. The printer checks the alignment of the paper. If it is not correctly aligned, the front panel displays help instructions. The printer trims the edge of the roll. 14-If there is an excess of loose paper wrap it back onto the roll by turning the roll; then press Enter. 15-The printer will now print its alignment pattern, using the paper you have loaded. If there is a problem printing, check the front panel error messages. Explanations of these messages are in the Pocket Guide. You should not cancel the alignment print as correct alignment of the printheads is essential for good-quality printing. You may also be prompted to let the printer perform its Color Calibration routine. Again, don't cancel this as it will help ensure that the colors printed are best for the paper you have loaded. Printhead Alignment and Color Calibration are different processes and should both be done when required. They are briefly described in the Pocket Guide and more fully in the online User's Reference Guide. 11. Understand Printer Connections (all models) If you have purchased a network card, for connecting your printer to a local area network (LAN), now is a good time to install it-see Stage 12. Also install now any HP-GL/2 Accessory card and any additional memory for your Accessory card. See the instructions packaged with these items for full information on how to install them. The HPL/2 Accessory card is installed in much the same way as a LAN card, as in Stage 12. See Stage 12 for connecting a LAN cable. Sockets for connecting your printer to a computer or to a network The diagram on the right shows the sockets (or "ports") that you can use. • The USB and parallel sockets are at the back of the printer, alongside the mains socket. • The LAN cable socket is inside the back cover of the printer-see Stage 12 on for how to access it. LAN cable socket (inside back cover) USB socket Parallel socket 12. Install and Connect a LAN Card (all models) NOTE: An internal HP JetDirect Print Server may already be installed in your printer, inside the compartment at the top left rear of the printer. If it is, skip to step 8 below. 1-Before installing a card, switch off the printer and unplug it from the mains electricity supply. 2-Carefully remove the plastic cover from the left-hand back of the printer by unclipping it. This cover gives access to the two slots for an Accessory card and a LAN card. a. Press in the thumb-tab on the side furthest from the edge that has the cable-hole. b. Ease the cover out in the direction of the embossed arrow, pivoting it by the hinge clips on the side that has the edge cable-hole. 3-Remove the cover completely. Inside the compartment there are two slots for a LAN card or an Accessory card. You can use either slot for either card, but we recommend putting a LAN card on the left (nearer to the front of the printer) and an Accessory card on the right. In this way the cable from the LAN card can easily pass through the slot in the door. 4-To insert a LAN card (or an Accessory card), remove the metal cover from the appropriate slot by unscrewing its two screws. You can use a screwdriver or do it manually. 5-When you have inserted the card, screw it into place, using its two screws (at the top and bottom of the card). Again, this can be done with a screwdriver or manually. 6-Insert the LAN cable into the LAN card-it is simply pushed into place with a click. 7-Carefully replace the plastic cover by clipping it back into place: a. Put the two hinge clips on the side that has the edge cable-hole into their slots. b. Swivel the cover in the direction opposite to the embossed arrow and clip the other two tabs on the opposite side into their slots. Ensure that the LAN cable passes correctly through the edge cable-hole (shown by the yellow arrow) and avoids touching the roll of paper on the spindle. 8-Network Printer: To obtain the information you'll need when you install the software: • Go to the Set-up menu in the printer's front panel. • Select I/O Set-up and press Enter. • Select Card ID and press Enter. There you will find the hardware address of your printer, as MAC=xxxxxxxx. You may also require an IP address or an AppleTalk name, for which the software will prompt you. Page 6 You have now finished the hardware assembly and set-up of your printer. Now you are ready to start the software set-up. Move on to stage 13 below.
-
 1
1 -
 2
2 -
 3
3 -
 4
4 -
 5
5 -
 6
6 -
 7
7 -
 8
8
 |
 |
