HP Deskjet 3050 User Guide - Page 37
Connectivity, Add the HP All-in-One to a network, WiFi Protected Setup (WPS) - wireless setup
 |
View all HP Deskjet 3050 manuals
Add to My Manuals
Save this manual to your list of manuals |
Page 37 highlights
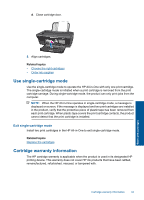
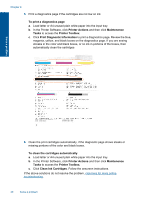
7 Connectivity Add the HP All-in-One to a network • WiFi Protected Setup (WPS) • Traditional Wireless Connection • USB Connection WiFi Protected Setup (WPS) To connect the HP All-in-One to a wireless network using WiFi Protected Setup (WPS), you will need the following: ❑ A wireless 802.11 network that includes a WPS-enabled wireless router or access point. ❑ A desktop computer or laptop with either wireless networking support, or a network interface card (NIC). The computer must be connected to the wireless network that you intend to install the HP All-in-One on. To connect the HP All-in-One using WiFi Protected Setup (WPS) 1. Do one of the following: Use Push Button (PBC) method ▲ Set up wireless connection. ❑ Press the wireless button on the control panel to show the wireless menu options on the printer display. ❑ Select Wireless Settings on the printer display. ❑ Select WPS. ❑ Select Push Button and follow the on-screen instructions on the printer display. NOTE: The product begins a timer for approximately two minutes in which the corresponding button on the networking device needs to be pressed. Use PIN method ▲ Set up wireless connection. ❑ Press the wireless button on the control panel to show the wireless menu options on the printer display. ❑ Select Wireless Settings on the printer display. ❑ Select WPS. ❑ Select PIN. The printer display will display a PIN. Connectivity Add the HP All-in-One to a network 35
-
 1
1 -
2
-
3
-
4
-
5
-
6
-
7
-
8
-
9
-
10
-
11
-
12
-
13
-
14
-
15
-
16
-
17
-
18
-
19
-
20
-
21
-
22
-
23
-
24
-
25
-
26
-
27
-
28
-
29
-
30
-
31
-
 32
32 -
 33
33 -
 34
34 -
 35
35 -
 36
36 -
 37
37 -
 38
38 -
 39
39 -
 40
40 -
 41
41 -
 42
42 -
43
-
44
-
45
-
46
-
47
-
48
-
49
-
50
-
51
-
52
-
53
-
54
-
55
-
56
-
57
-
58
-
59
-
60
-
61
-
62
-
63
-
64
-
65
-
66
 |
 |
